How to Heat Press a Hat: Everything You Need to Know
by Alice Davis
Ever wondered why some custom hats look sharp and professional while others bubble, peel, or fade after just a few washes? The difference almost always comes down to technique. Knowing how to heat press a hat correctly — with the right equipment, temperature, and timing — separates a crisp, lasting design from a ruined $30 cap. Our team has worked through hundreds of hat press projects, from emblem-style logos on structured snapbacks to full-front designs on soft dad hats, and we've learned what works and what definitely doesn't. This guide covers the complete process so anyone can get professional results from day one.
For anyone who also works with transfer film on flat surfaces, our post on how to apply heat transfer vinyl with an iron is a great companion read. Both topics live inside our heat press and vinyl resource hub, which covers the full range of transfer methods and tools.
Contents
How to Heat Press a Hat: The Complete Process
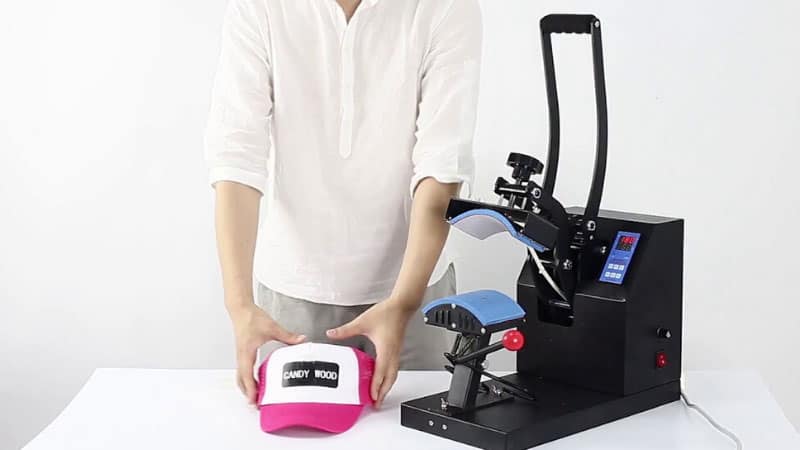
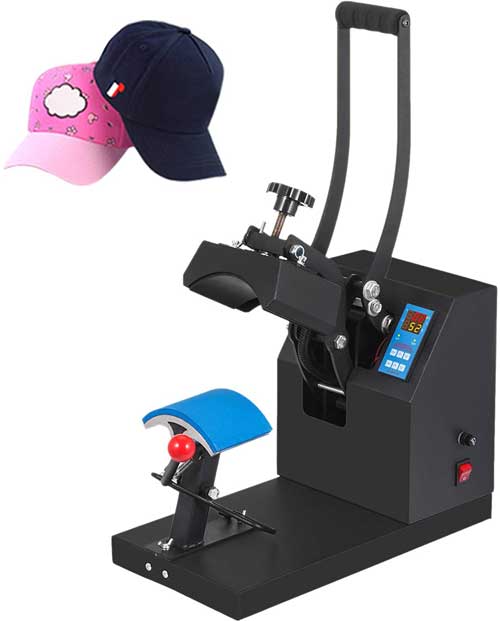
This is where most people get tripped up. Hats aren't flat like t-shirts, and that changes everything. A standard flat heat press machine creates uneven contact on a curved hat panel, which means weak bonding at the edges and a design that falls apart after a few washes. The solution is a cap press — a machine built with a curved lower platen (the heated plate that presses the transfer) that follows the contour of the hat front.
Our team uses a cap press for every single hat project. It's not optional for reliable results. Here's the full equipment list and the exact process our team follows.
Equipment Needed
- Cap heat press machine — features a curved lower platen designed for hat panels
- Heat transfer vinyl (HTV) or sublimation paper — chosen based on hat fabric type
- Weeding tool — removes excess vinyl from around the cut design
- Teflon sheet or parchment paper — protects the hat surface from direct contact with the hot platen
- Hat form or foam insert — placed inside the hat to create a stable, flat pressing surface
- Heat-resistant tape — holds the transfer in position during the press cycle
- Infrared thermometer — confirms the platen is actually reaching the target temperature (cheap ones are often off by 15°F or more)
Step-by-Step Instructions
- Pre-press the hat. Place the hat on the lower platen with no transfer. Close the press for 3–5 seconds. This removes moisture and smooths out any wrinkles in the panel. Skipping this is the top reason bonds fail.
- Prepare the design. Cut and weed the HTV. Mirror the image if the design includes text. Trim the carrier sheet close to the design edges — excess carrier causes uneven pressure.
- Position the transfer carefully. Center the design on the front panel. Use heat-resistant tape at the edges to secure it. Keep the design away from seams and buttons — those areas won't bond cleanly.
- Dial in temperature and time. Most HTV presses well at 305–315°F (152–157°C) for 15–20 seconds. The vinyl manufacturer's spec sheet is the only reliable source for this — brands vary significantly.
- Press with firm, even pressure. Close the press fully and let it run the complete time. No lifting early to check progress — that breaks the bond mid-cure.
- Peel the carrier sheet. Hot peel or cold peel depends on the specific vinyl. When the packaging is unclear, letting the hat cool for 10–15 seconds and then peeling slowly at a low angle is the safest approach.
- Inspect and re-press any lifting edges. If corners or edges lift, place a Teflon sheet over the area and press again for 5–8 seconds. This almost always closes the gap.
Pro tip: Always pre-press the hat before applying any transfer — skipping this one step is the single most common reason designs fail to bond on the first press, and it takes less than five seconds to do.
Real Results: What Pressed Hats Look Like in Practice
Not all hats behave the same under a press. Our team has tested structured caps, unstructured dad hats, mesh trucker caps, and beanies. Each one has its quirks, and the results vary more than most people expect.
Structured Caps
Structured caps — like classic fitted baseball caps — have a stiff front panel reinforced with buckram (a stiff fabric liner bonded inside the panel). This makes them the easiest hat type to press. The panel sits naturally against the curved platen with consistent contact across the surface.
- HTV bonds cleanly and evenly across the full panel
- Less warping risk compared to soft hats
- Works well for emblem-style designs up to 4 inches wide
- Sublimation is a strong option on white polyester structured caps
- Snapbacks and fitted caps both fall into this category — both press the same way
Unstructured and Soft Hats
Unstructured hats — dad hats, beanies, soft baseball caps — are a different challenge. The front panel is soft and curves more than a structured cap, which means the platen contact is uneven without extra support.
- A foam hat form or rolled hand towel placed inside the hat creates the resistance needed for even pressure
- Designs should stay under 3 inches wide for the best contact surface
- Press time increases slightly — 20–25 seconds — to compensate for uneven heat distribution
- Cotton beanies accept HTV but don't work with sublimation
Our team considers mesh trucker hats the most challenging type. The mesh back panels can't be pressed at all, and even the structured front panel provides less stability than a full buckram cap. For trucker hats, our team sticks to thin, flexible HTV and keeps designs small to avoid a stiff, heavy feel on the panel.
Fixing Common Heat Press Hat Problems
Things go wrong even for experienced pressers. Here's what our team encounters most often — and exactly how to fix it. According to Wikipedia's overview of heat transfer printing, the bonding process depends on precise combinations of temperature and pressure applied simultaneously — which is why hat pressing is more error-prone than flat garment work.
Peeling and Lifting Edges
- Cause: Temperature too low, press time too short, or moisture trapped in the hat fabric
- Fix: Pre-press the hat first. Increase temperature in 5°F increments. Re-press lifting edges for 8 seconds with a Teflon sheet on top.
Scorching or Shiny Marks
- Cause: Temperature too high, or pressing directly on certain fabric types without a cover sheet
- Fix: Always place a Teflon sheet between the platen and the hat. Lower the temp by 10°F. Wool and acrylic blends are especially prone to scorching.
| Problem | Likely Cause | Fix |
|---|---|---|
| Design peels after wash | Temp too low or time too short | Increase temp/time; always pre-press first |
| Shiny or scorched marks | No cover sheet; temp too high | Use Teflon sheet; lower temp by 10°F |
| Design shifted during press | No heat tape used | Secure transfer with heat-resistant tape before pressing |
| Uneven bond at edges | Flat platen used on curved hat | Use a cap press with curved platen; add foam hat insert |
| Bubbles under transfer | Moisture or air pockets | Pre-press for 5 seconds; smooth carrier sheet before pressing |
| Colors look faded or washed out | Sublimation on wrong fabric | Sublimation only works on polyester (65% minimum) |
What It Costs to Get Started
Startup cost is one of the first questions our team gets from anyone considering hat heat pressing. The range is wide — from a modest hobby setup to a production-level investment. Here's an honest breakdown by category.
Machine Costs
- Entry-level cap press (manual, basic digital controls): $150–$300
- Mid-range cap press (digital timer and temp control, consistent results): $300–$600
- Combo press (flat platen + cap platen, two machines in one): $600–$1,200
- Commercial production press (high volume, fast cycle times): $1,500 and up
For home crafters and small business owners, a mid-range machine in the $300–$450 range hits the right balance of reliability and cost. Entry-level presses often have inconsistent platen temperatures, which causes frustrating failures that a better machine would have prevented.
Ongoing Supplies
- HTV rolls: $8–$25 per roll (12 inches wide, 5–15 feet long)
- Blank structured caps: $4–$12 each when bought in bulk
- Teflon sheets: $5–$10 for a 5-pack
- Heat-resistant tape: $5–$8 per roll
- Hat forms or foam inserts: $10–$20 for a set of three
| Setup Type | Estimated Startup Cost | Best For |
|---|---|---|
| Hobby / home use | $200–$450 | Personal projects, gifts, small custom runs |
| Small side business | $500–$900 | Etsy shops, local orders, craft markets |
| Small production shop | $1,200–$2,500 | Consistent volume, multiple hat styles |
Anyone curious about the profit potential of a custom hat or apparel business will find useful context in our post on how much profit a t-shirt business makes in a year — the margin math applies to hats too.
Mistakes That Ruin Hats (and How to Avoid Them)
Our team has made most of these mistakes at some point. Learning from them is much cheaper than repeating them on finished hats.
- Using a flat press on a curved hat. The platen only contacts the center of the panel. Edges get little to no pressure and won't bond. A cap press is necessary — not optional.
- Skipping the pre-press step. Moisture trapped in the fabric creates steam under the transfer during pressing. The result is bubbles or a bond that fails within the first few washes. Pre-pressing takes five seconds and eliminates this entirely.
- Guessing at temperature. Different vinyl brands have different optimal temperatures. The manufacturer's spec sheet is the only reliable reference. A cheap infrared thermometer verifies whether the platen is actually hitting the target — many budget machines run 15–20°F off from the dial reading.
- Pressing designs over seams or hardware. The transfer needs solid fabric contact. A seam or raised button creates a gap where the vinyl lifts immediately. Design placement should stay fully on the flat panel area.
- Setting HTV temperatures on polyester-blend hats. Polyester begins to scorch around 320°F. Our team always checks the hat's fabric content before dialing in the press. High-polyester hats need lower temps and shorter press times.
- Peeling too fast or at the wrong angle. A sharp, fast peel rips the vinyl or pulls carrier film back into the design. A slow peel at a low angle — almost parallel to the hat surface — consistently produces clean results.
- Forgetting to protect the brim and closure hardware. Metal buckles and snap closures get hot quickly. Wrapping the brim or placing a silicone pad over hardware prevents heat damage to the hat while the panel is being pressed.
Warning: Wool and acrylic blend hats can scorch or even melt at standard HTV temperatures — always test a scrap piece of the exact same fabric before pressing any finished hat.
Clearing Up Heat Press Hat Myths
Misinformation about how to heat press a hat circulates widely online. Our team has tested these claims directly. Here's what the evidence actually shows.
- Myth: A regular household iron works just as well as a cap press. It doesn't. An iron has a flat, curved sole and delivers inconsistent pressure across a rounded hat panel. The result is almost always partial bonding and early peeling — often within the first few washes. A proper cap press is the only reliable method. On flat fabric, though, an iron can produce decent results — our iron-based HTV guide covers when and how that works.
- Myth: Higher temperature means faster, stronger bonding. This is backwards. Excessive heat scorches the hat fabric and breaks down the vinyl adhesive layer before it can cure properly. The optimal temp range is narrow — going 30°F above the spec can destroy the transfer entirely.
- Myth: Any hat works for sublimation printing. Sublimation ink only bonds to polyester fibers. Cotton hats produce faded, blotchy prints that look nothing like the source design. Only white or very light polyester caps — at least 65% polyester content — produce the vivid, permanent results sublimation is known for.
- Myth: More pressure produces a stronger bond. Over-pressing compresses the vinyl and distorts the hat's shape — especially the brim area of structured caps. Firm, consistent pressure is correct. Forcing the platen down beyond the natural close point doesn't improve adhesion. It just damages the hat.
- Myth: The design can be washed immediately after pressing to test durability. HTV requires a full 24-hour cure window after pressing before washing. The adhesive continues cross-linking during that period. Washing immediately — even gently in cold water — risks early failure on a design that would have been perfectly durable otherwise.
- Myth: Darker hat colors require longer press times. Hat color has no effect on bonding. Fabric type, hat thickness, and the specific vinyl brand are the variables that actually matter. Press time should follow the vinyl spec sheet, not the hat color.
Comparing Heat Press Methods Side by Side
Several methods exist for getting a design onto a hat. Our team has hands-on experience with all of them. Here's an honest comparison of how they stack up across the factors that matter most.
| Method | Equipment Required | Best Hat Types | Durability | Skill Level | Cost to Start |
|---|---|---|---|---|---|
| Cap press + HTV | Cap press, HTV, weeding tool | Most hat types | Excellent (50+ washes) | Beginner–Intermediate | $200–$600 |
| Sublimation | Sublimation printer, cap press | White polyester caps only | Permanent (won't peel) | Intermediate | $400–$900 |
| Iron-on transfer | Household iron | Flat-front beanies only | Fair (10–20 washes) | Beginner | $20–$50 |
| Embroidery | Embroidery machine | Structured caps (premium) | Outstanding (lifetime) | Advanced | $500–$3,000+ |
| Screen printing | Full screen printing setup | Flat panel caps, high volume | Excellent | Advanced | $1,000+ |
For most home crafters and small business owners, HTV with a cap press is the clear winner. It balances low startup cost, a manageable learning curve, and strong durability. Sublimation edges ahead for full-color photo-quality designs but requires a polyester-only blank. Embroidery is the premium option for high-end structured caps but carries a much larger equipment investment and steeper skill requirement.
Frequently Asked Questions
What temperature should anyone use when heat pressing a hat?
Most HTV brands press cleanly at 305–315°F (152–157°C) for 15–20 seconds on typical hat fabric. Sublimation transfers on polyester caps require higher temps — generally 380–400°F. The vinyl or transfer manufacturer's spec sheet is always the authoritative source, since different brands have meaningfully different requirements. Using a cheap infrared thermometer to verify actual platen temperature is strongly recommended, as many budget machines run 15–20°F cooler than the dial indicates.
Is it possible to heat press a hat without a cap press machine?
It's possible on flat-front beanies or very soft panels using a household iron, but results are inconsistent and often short-lived. A flat iron can't maintain even pressure on a curved hat surface, which means partial bonding and early peeling are the typical outcome. For durable, wash-resistant results on any structured or semi-structured cap, a dedicated cap press with a curved platen is necessary.
How many washes does a heat pressed hat design typically survive?
A properly pressed HTV design on a hat regularly lasts 50 or more wash cycles when the hat is washed inside-out in cold water on a gentle cycle and air-dried. Sublimation designs are effectively permanent and won't peel or crack. Longevity depends on correct press settings, pre-pressing the hat to remove moisture, and waiting the full 24-hour cure window before the first wash.
What hat types work best for heat pressing?
Structured baseball caps with buckram-reinforced front panels are the easiest and most reliable hat type to press. The stiff panel sits flat against the curved platen and delivers consistent contact across the design area. Unstructured dad hats work well with proper foam support inside. Mesh trucker caps are the most challenging — only the structured front panel can be pressed, and thin HTV must be used to avoid a stiff, unnatural feel.
Next Steps
- Pick up a mid-range cap press machine with a curved platen — this is the single most important equipment decision, and the $300–$450 range delivers consistent results without overspending.
- Order a starter pack of HTV in three or four colors and a set of blank structured caps to practice the full press process before working on any real orders or finished hats.
- Download the spec sheet for the chosen HTV brand and confirm the recommended temperature and press time before the first press — don't guess at settings.
- Run three test presses on scrap hats at slightly different temperatures and times, document which combination produces the cleanest bond, and use that as a baseline for every future project.
- Explore the full heat press and vinyl resource hub for deeper dives into vinyl types, cutter setup, transfer layering, and advanced hat customization techniques.


About Alice Davis
Alice Davis is a crafts educator and DIY enthusiast based in Long Beach, California. She spent six years teaching textile design and applied arts at a community college, where she introduced students to everything from basic sewing techniques to vinyl cutting machines and heat press printing as practical, production-ready tools. That classroom experience means she has put more sewing machines, embroidery setups, Cricut systems, and heat press units through real project work than most reviewers ever will. At PalmGear, she covers sewing machines and embroidery tools, vinyl cutters, heat press gear, Cricut accessories, and T-shirt printing guides.
You can get FREE Gifts. Or latest Free phones here.
Disable Ad block to reveal all the info. Once done, hit a button below