RV Gear ›
RV Dump Station: How to Use One Correctly Step by Step
by Jake Mercer
Over 10 million households in the United States now own an RV, yet surveys show that improper black tank dumping is among the top three newbie mistakes — right behind forgetting to retract the awning. Knowing how to use an RV dump station correctly is the kind of foundational skill that separates confident RVers from the ones hunched over a sewer hose wondering what they did wrong. The process is logical, fast, and repeatable once you've done it a few times. Head over to the RV gear category for more guides that cover the full range of accessories you'll want on the road.
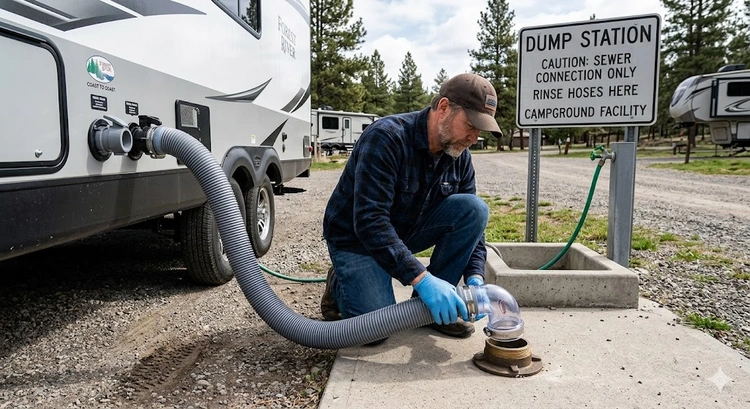
The dump station process looks daunting from the outside — there's a sewer hole, a water spigot, posted instructions that are faded beyond reading, and someone idling behind you in a Class A. But the actual sequence is completely logical. Black tank first, gray tank second. That order isn't a preference; it's how you use the gray water to flush residue out of your sewer hose on the way out. Skipping it means you're storing a dirty hose and creating a smell problem you didn't need.
This guide walks you through every step, covers what gear to keep in your dump kit, breaks down what stations actually cost, and shows you how to build a maintenance routine that keeps your tank system healthy long-term. If you've ever had holding tank sensors giving you phantom readings, consistent and thorough dumping habits are part of the fix there too.
Contents
- The Anatomy of an RV Dump Station
- How to Use an RV Dump Station: Step by Step
- What to Bring: Your Dump Station Kit
- What Using a Dump Station Actually Costs
- When to Dump and When to Hold Off
- When Something Goes Wrong: Troubleshooting
- Protecting Your Tank System for the Long Haul
- Frequently Asked Questions
- Next Steps
The Anatomy of an RV Dump Station
What You'll Find at a Standard Station
Before you can master how to use an RV dump station, you need to know exactly what you're working with. A standard station has three components: a sewer inlet (the ground-level hole where waste goes), a freshwater spigot for rinsing, and typically a hose holder or trash can. Some stations add a pressurized rinse wand you can insert directly into your sewer hose to flush it out. That's the full setup. No mystery equipment, nothing exotic.
Dump stations exist at campgrounds, state and national parks, many Flying J and Pilot truck stops, Camping World locations, select Walmart parking lots, and dedicated municipal sanitation sites. The EPA treats RV black water as regulated sewage, which is why proper disposal through sanctioned dump stations isn't just good manners — it's legally required in virtually every jurisdiction in the country. The station's water spigot is for rinsing only, never for filling your fresh tank. Burn that distinction into your memory now.
How to Use an RV Dump Station: Step by Step
Before You Pull In
Check your tank levels before you leave your campsite. Your black tank should be at least two-thirds full before you dump — dumping at one-third capacity leaves solids behind and is the number one cause of pyramid plugs, which are exactly as unpleasant to deal with as they sound. If you've ever dealt with persistent gray tank odors and clogs, low-volume dumping at the gray side is often a contributing factor there as well.
Pull in so your sewer connection is as close to the inlet as possible. Most sewer hoses extend 10–20 feet, but a shorter reach is always a cleaner operation. Get your nitrile gloves on before you touch anything. This is not optional.
The Dump Sequence
Follow this exact order every single time without deviation:
- Put on nitrile gloves before touching any fittings.
- Remove the sewer hose from storage and connect it securely to your RV's sewer outlet — use a 90-degree swivel elbow if your outlet sits high off the ground.
- Place the opposite end firmly into the dump station's sewer inlet. Use a donut seal if available; it contains fumes and prevents splash-back.
- Open the black tank valve fully. Let it drain completely. You'll hear the flow slow, then stop.
- Close the black tank valve.
- Open the gray tank valve. The gray water flushes any residual waste through the hose and down the inlet.
- Close the gray tank valve.
- Use the station's rinse water to flush the inside of your sewer hose before disconnecting.
- Disconnect the hose, cap both ends, and store it in its dedicated compartment.
- Rinse the area around the sewer inlet with the spray hose if one is available.
Pro tip: Never open the black and gray valves at the same time — you lose the flushing effect and risk a partial drain on both tanks that leaves residue behind.
Finishing Up
Once the hose is stored and your gloves are off, run your tank flush system if your rig has one. Most modern RVs include a built-in black tank flush port that accepts a standard garden hose. Connect the station's water hose, open the black tank valve slightly, and let clean water rinse the interior. Run it until the outflow clears. This single step does more for your long-term sensor accuracy than any tank treatment product on the market. Don't skip it when the station gives you the water to do it.
What to Bring: Your Dump Station Kit
The Essentials
Your dump kit lives in a dedicated external compartment and never shares space with food or gear. The baseline setup is a 20-foot heavy-duty sewer hose (Camco Rhinoflex or Valterra Dominator are the go-to choices), a 90-degree swivel bayonet fitting, a donut seal or inlet cap adapter, a dedicated garden hose for tank flushing clearly marked so it's never confused with your drinking water line, a box of nitrile gloves, and paper towels. That covers every standard dump situation you'll encounter.
If your RV doesn't have a built-in black tank flush port, a wand-style tank rinser that inserts through the toilet works as a backup — slower and less pleasant, but effective. One thing worth keeping in the same compartment: your water pressure regulator, since some station spigots run well above the 45–60 PSI your RV plumbing is designed for.
Campsite setup also matters here. A properly leveled rig drains tanks more completely than one sitting at an angle. If you haven't dialed in your site leveling routine, the breakdown of leveling blocks vs. stabilizer jacks is worth reading — how level your rig sits directly affects how thoroughly your tanks drain at the station.
What Using a Dump Station Actually Costs
Fee Ranges by Location Type
Dump station fees vary more than most RVers expect going in. Here's a realistic breakdown across the most common station types:
| Location Type | Typical Fee | What's Included | Notes |
|---|---|---|---|
| Campground (registered guest) | Free | Water, rinse access | Included in site fee at most campgrounds |
| Campground (non-guest pass-through) | $5–$15 | Water, sometimes rinse wand | KOA, Good Sam, and Jellystone sites commonly offer this |
| Truck stop / travel plaza | $10–$20 | Water only | Flying J and Pilot are the most consistent options nationally |
| Camping World | $10–$15 | Water, rinse | Free with Good Sam Elite membership |
| Municipal / county sanitation site | $5–$10 | Varies by site | Often token or coin-operated; call ahead to confirm access |
| State or National Park | Free–$10 | Water | Usually included with paid camping permit |
If you're a full-timer or a serious seasonal traveler, a Good Sam or Passport America membership pays for itself in dump station savings alone within the first season. The Sanidumps.com app is also worth downloading — it's the most comprehensive free directory of dump stations in North America and has saved more than a few RVers from a very inconvenient situation.
When to Dump and When to Hold Off
The Two-Thirds Rule
Dump when your black tank hits two-thirds capacity. That's the rule, and it doesn't have exceptions. Less than that and you don't have enough volume to carry solids fully out during the dump. At 100% full, you risk backflow when you open the valve, and you're operating with no margin at all. Two-thirds is the right window every time, and it's the standard recommendation for good reason.
Gray Water Is More Forgiving
The calculus is different for your gray tank. Gray tanks fill faster — showers, sinks, and dishwashing add up quickly — and gray water doesn't carry the same biological risk that governs black tank timing. You can dump gray more frequently without worrying about fill-level minimums. Many RVers at full-hookup sites leave their gray valve cracked open continuously, but this dries out the P-trap over time and creates its own odor problem. I'd avoid it for anything beyond a one-night stay.
You should hold off on dumping when the station has a posted out-of-service notice, when your tanks are under half full and there's another station within reasonable range, or when you're deep in a boondocking stretch with no station access imminent — in that case, tank enzyme treatments and patience serve you better than an ill-timed low-volume dump.
When Something Goes Wrong: Troubleshooting
Slow or Partial Drain
A black tank that drains sluggishly or seems to stop before it's empty almost always points to a pyramid plug — a hardened cone of solids that forms when tanks are dumped repeatedly at low fill levels. The fix is filling the tank halfway with water and a concentrated enzyme treatment, driving some miles on rough road if you can manage it, letting it sit overnight, then dumping again. For more stubborn blockages, a macerator pump can break through what gravity alone won't move.
Hose Leaks or Mid-Dump Disconnections
Leaking at the connection points is almost always a worn bayonet fitting or a missing O-ring. Replace both every year regardless of how they look — the cost is negligible compared to the alternative. A hose that disconnects mid-dump is the scenario you're prevented from by checking both ends are fully seated before you open any valve. Check them. Every time. No exceptions based on how confident you feel.
Tank Sensors Still Reading Full After Dumping
If your sensors still show full after a complete and thorough dump, you have coating buildup on the sensor probes inside the tank. This is a separate issue from the dump process itself — see the detailed guide on fixing RV holding tank sensors that won't read correctly for the cleaning methods that actually work. Consistent post-dump tank flushing is the prevention. Skipping the rinse step is what causes this to accumulate in the first place.
Protecting Your Tank System for the Long Haul
Between-Visit Habits
The dump station visit is the acute event, but your tank health is determined by what you do between visits. Use enzyme-based tank treatments every time you close the black tank valve after dumping — not chemical deodorizers, which kill the beneficial bacteria needed to break down waste. Keep 2–3 gallons of water sitting in the black tank at all times between uses so solids stay suspended and can't form a plug.
For the gray tank, monthly deep cleaning prevents the grease and soap scum accumulation that causes persistent odors even when the tank is empty. The full process is worth bookmarking: how to clean and deodorize your RV gray tank covers every step. Pair that with a regular sanitization schedule for your fresh water side — RV fresh water tank cleaning and maintenance has the protocol you need there. Run both on the same monthly calendar so neither gets neglected.
In cold-weather camping, tank freeze protection becomes part of the routine. Your heating setup matters more than people realize for keeping tank lines and valves functional — if you're camping in temperatures below freezing and haven't sorted your heat source, the comparison between diesel and propane RV heaters is worth reading before the temperature drops. And one thing RVers consistently overlook: interior humidity affects vent pipe integrity and accelerates tank odor problems. If condensation is a recurring issue in your rig, an RV dehumidifier belongs on your gear list alongside your tank maintenance supplies.

Frequently Asked Questions
Can you dump your RV black tank anywhere other than a dump station?
No. Dumping black water outside of a sanctioned dump station, full-hookup sewer connection, or approved portable waste transport system is illegal in virtually every U.S. state and Canadian province. Fines are steep and enforcement at campgrounds and public lands has increased. Always use an approved facility — the Sanidumps.com directory makes it easy to find one wherever you're traveling.
How long does it take to use an RV dump station from start to finish?
A complete dump including black tank flush rinse takes 15–25 minutes depending on tank size and how thorough your rinse cycle is. If you skip the flush step you can finish in under 10 minutes, but skipping it consistently is what leads to pyramid plugs and sensor buildup. Budget the full time — the people behind you have done it before and understand.
Do I need to add water to my black tank before heading to a dump station?
Yes, always maintain at least 2–3 gallons of water in your black tank between uses. This keeps solids suspended so they actually drain out during the dump. If your tank has dried out between trips, add water and let it sit for a few hours before you dump — trying to drain a dry tank is how pyramid plugs start.
What should I do if the dump station water spigot isn't working?
Use water from your onboard fresh tank through your dedicated rinse hose — this is exactly why you carry a clearly marked secondary hose for tank flushing. Never connect your drinking water hose to anything sewer-adjacent. If you have no rinse water available at all, cap both hose ends cleanly and plan to fully flush the hose at the next station you reach before putting it back in long-term storage.
Next Steps
- Audit your dump kit today — pull out your sewer hose, check it for cracks or worn fittings, replace any O-rings that look compressed or flat, and restock your nitrile gloves if you're running low.
- Download the Sanidumps.com app or bookmark the website so you always know where the nearest station is before your tank hits two-thirds — not after.
- Add a bottle of enzyme-based black tank treatment to your supply kit and start using it every time you close the black valve after a dump.
- Set a monthly reminder to perform a full black tank flush — connect your rinse hose at the flush port and run it until the outflow runs clear, not just until the tank reads empty.
- Put the gray tank deep-clean guide on the same monthly maintenance calendar so your entire waste system stays in good shape between dump station visits.


About Jake Mercer
Jake Mercer spent twelve years behind the wheel as a long-haul trucker, covering routes across the continental United States and logging well over a million miles. That career gave him an unusually thorough education in CB radio equipment — he has tested base station antennas, magnetic mounts, coax cables, and handheld units in real-world conditions where reliable communication actually matters. After leaving trucking, Jake transitioned to full-time RV travel and has since put hundreds of RV accessories through their paces across national parks, boondocking sites, and full-hookup campgrounds from Montana to Florida. At PalmGear, he covers RV gear and accessories, CB radios, shortwave receivers, and handheld radio equipment.
You can get FREE Gifts. Or latest Free phones here.
Disable Ad block to reveal all the info. Once done, hit a button below