RV Gear ›
RV Plugged In But No Power? Here Is How To Troubleshoot And Fix It.
by Jake Mercer
Electrical problems account for roughly 30 percent of all RV service center repair orders, making them the single most common category of RV maintenance complaints — and the scenario that stops owners cold is the classic rv plugged in but no power situation. The shore cord is seated in the pedestal. The campground outlet shows live voltage. The main breaker hasn't tripped. Yet every circuit inside the coach is dead. Understanding the layered architecture of RV electrical systems is the foundation of resolving this correctly and efficiently.

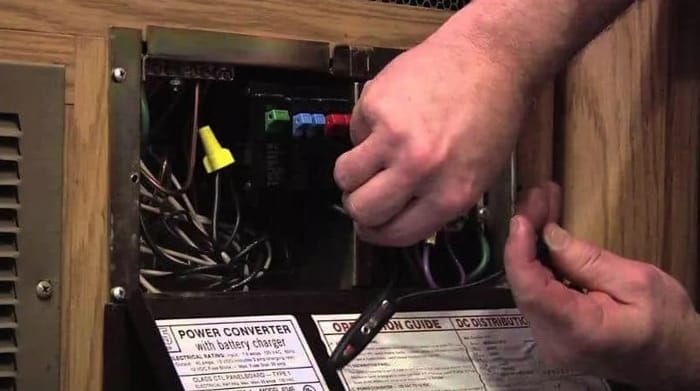
The electrical chain in a modern recreational vehicle runs from the shore power inlet through a main disconnect, distribution panel, GFCI branch circuits, converter/charger, 12V house battery bank, and in many configurations a transfer switch or Energy Management System. A fault at any point in that chain produces identical symptoms from inside the coach. Targeted, sequential diagnosis is the approach that consistently cuts diagnostic time. Randomly swapping components based on guesswork can push repair costs past $500 before the actual fault is identified. Browsing the full lineup of RV gear solutions reveals the protective devices and diagnostic tools that make this process faster and more reliable.
Contents
Diagnosing Shore Power Loss: A Systematic Approach
Check the Pedestal First
When rv plugged in but no power conditions arise, the campground pedestal is the logical first test point. A non-contact voltage tester or a simple plug-in outlet tester confirms whether the problem originates outside the coach entirely. Pedestals at high-volume campgrounds trip their own breakers regularly — sometimes from an adjacent site drawing excessive current, sometimes from moisture inside the outlet housing. Reset the pedestal breaker, wait ten seconds, then retest. If the pedestal outlet reads zero volts, the problem is the campground's infrastructure and a different site or an onboard generator becomes the immediate path forward.
Breaker Panel and GFCI Outlets
If the pedestal tests live, move to the coach's main breaker — typically a 30A or 50A two-pole breaker at the top of the distribution panel. Breakers that have tripped often rest in a middle position rather than fully OFF, and they require a firm push to OFF before they can be reset to ON. After the main, inspect every individual circuit breaker in the panel, including those labeled for the converter and any inverter circuits. Then locate every GFCI outlet in the coach — standard placement includes bathrooms, kitchen, and exterior utility compartments. A single tripped GFCI can kill power to an entire branch of circuits. Press the TEST button, then RESET, on every GFCI outlet regardless of location. Many owners overlook exterior compartment GFCI outlets that protect interior circuits on the same branch.
Errors That Waste Hours and Dollars
Skipping the Obvious Steps
The most expensive diagnostic mistake in any rv plugged in but no power scenario is jumping straight to advanced components — inverters, converters, transfer switches — before verifying the basics. Experienced RV service technicians report that 40 to 50 percent of "no power" calls turn out to be a tripped GFCI, a tripped pedestal breaker, or a loose shore cord connection at the inlet. These checks take under five minutes. Skipping them in favor of expensive component replacements wastes money and extends the outage unnecessarily.
Overloading the Shore Circuit
Running the rooftop AC unit, microwave, hair dryer, and battery charger simultaneously on a 30-amp circuit draws more current than the shore connection can sustain. The result is a tripped breaker that looks identical to a power failure. Staggering high-draw appliance startup sequences — AC first, then microwave when needed, never simultaneously with a hair dryer or space heater — keeps peak draw within the 30-amp window. For rigs that consistently push load limits, upgrading to a 50-amp service pedestal or adding a portable load-balancing device eliminates most nuisance trips entirely.
Which RV Configurations Are Most Vulnerable
Motorhomes vs Towables
Class A diesel pushers and Class C motorhomes typically carry more complex electrical architectures than travel trailers: dual battery banks, residential inverter/chargers, and automatic transfer switches that can fail independently of the breaker panel. When a motorhome presents with rv plugged in but no power and the breaker panel checks clean, the automatic transfer switch becomes a prime suspect. These switches route shore power to the distribution panel; a failed switch leaves the panel completely islanded regardless of what the pedestal does. Travel trailers and fifth wheels run simpler systems — usually a single converter/charger feeding one 12V battery bank — which makes fault isolation faster, though the same sequential diagnostic steps still apply.
30-Amp vs 50-Amp Systems
The physical connector type signals the system's power budget and its failure modes. A 30-amp TT-30 plug feeds a single 120V hot leg at 3,600 watts maximum. A 50-amp CS6365 connector feeds two 120V legs at up to 12,000 watts combined. When a 50-amp system shows partial power — one leg live and one dead — half the breakers in the panel will be live and half will be dark. This classic pattern indicates either a two-pole main breaker failure or a pedestal wiring fault on the campground side. According to the Wikipedia overview of shore power systems, split-phase configurations are standard in North American campground pedestals, which makes single-leg failures one of the most documented failure modes in the RV electrical service literature.
Proven Shortcuts for Faster Fixes
The Multimeter Method
A basic digital multimeter available for under $30 cuts diagnostic time dramatically. Measuring AC voltage at the shore power inlet, then at the main breaker output lugs, then at individual circuit breakers in sequence, creates a voltage map that pinpoints exactly where the circuit goes open. Continuity testing the shore cord itself — end to end with the cord unplugged — rules out internal conductor failures, which are more common than most owners expect given the bending, coiling, and UV exposure a shore cord accumulates across seasons of use. A failed cord with an internal break at a stress point looks exactly like a dead pedestal from inside the coach.
EMS and Surge Protectors
An Energy Management System does more than guard against voltage spikes — it logs fault events and displays diagnostic codes that communicate the exact failure mode without the need for a multimeter at the pedestal. EMS units can identify low voltage, open neutral, reverse polarity, and miswired pedestals before any current reaches the coach's distribution panel. For frequent campground users, a hardwired EMS is one of the most cost-effective electrical investments available. A detailed breakdown of how protective devices differ and what specific failure modes each one handles appears in this guide to RV EMS vs Surge Protector.
Simple Fixes Versus Deep Electrical Repairs
What DIYers Can Handle
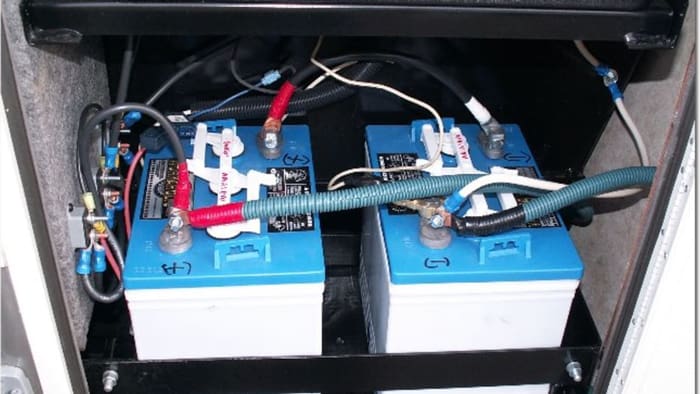
GFCI resets, breaker resets, shore cord inspections, and basic battery terminal cleaning are well within DIY reach with minimal tooling. Battery voltage checks provide useful data points: a fully charged group-24 or group-27 lead-acid battery should read 12.6V or higher at rest. A reading below 12.0V indicates a discharged bank that the converter may be struggling to charge, which can manifest as reduced 12V system performance even when shore power is otherwise functional. Cleaning corroded battery terminals with a wire brush and baking soda solution restores conductivity that corrosion has gradually degraded.
When to Call a Technician
Transfer switch replacement, shore power inlet socket replacement, and any work inside the distribution panel's main lug compartment requires a qualified RV technician or licensed electrician. Inverter/charger diagnostics — particularly on residential inverter systems in high-end Class A coaches — involve line voltages that are genuinely dangerous without proper training and PPE. The table below outlines which repairs fall into each category and typical time requirements.
| Repair Type | DIY Feasible? | Typical Time | Parts Cost |
|---|---|---|---|
| GFCI outlet reset | Yes | 2–5 min | $0 |
| Breaker reset / replacement | Yes (reset); Pro (replace main) | 5–15 min | $5–$25 |
| Shore cord replacement | Yes | 15–30 min | $40–$80 |
| Shore power inlet socket | Limited | 1–2 hrs | $30–$80 |
| Transfer switch replacement | No | 2–4 hrs | $80–$250 |
| Inverter/charger replacement | No | 3–6 hrs | $300–$1,200 |
The Real Cost of Shore Power Repairs
DIY Part Costs
Building a diagnostic and repair kit for RV electrical troubleshooting doesn't require significant investment. A 30-amp shore cord (30 feet) runs $40–$80. Replacement GFCI outlets cost $15–$25 each. Pedestal adapters — 30A to 50A or the reverse — run $20–$45. A capable digital multimeter fits in the $25–$60 range. A plug-in outlet tester with reverse polarity and open neutral indicators costs under $15. Terminal cleaning brushes and anti-corrosion spray add another $10–$20. The complete kit comes in under $200 and handles the majority of failure scenarios that cause the rv plugged in but no power condition.
Professional Service Rates
Transfer switch replacement at a certified RV service center runs $200–$600 depending on switch type, coach access difficulty, and regional labor rates. Shore power inlet socket replacement lands at $150–$300 including parts. Inverter/charger replacement ranges from $400 to $1,500 depending on unit capacity and brand. RV service center labor rates typically fall between $100 and $175 per hour. Scheduling service during the off-season — late fall through early spring — often cuts wait times from weeks to days and can yield discounted labor in slower shops. The full scope of protective accessories worth considering for any RV electrical system is covered in the comprehensive Best RV Accessories guide, which includes specific product categories for surge protection, battery monitoring, and load management.
Shore Power Versus Generator: An Honest Comparison
Advantages of Shore Power
Shore power delivers unlimited, stable electricity without fuel costs, combustion noise, or exhaust management — assuming the campground infrastructure is functional and the coach wiring is healthy. Smart converter/chargers running on clean shore power apply tapered multi-stage charging profiles to the house battery bank, which extends battery cycle life compared to generator charging. Generators typically operate at a fixed output level that doesn't match the variable current demand of a tapered charge cycle, producing more heat and somewhat less efficient charge acceptance in lead-acid and AGM batteries.
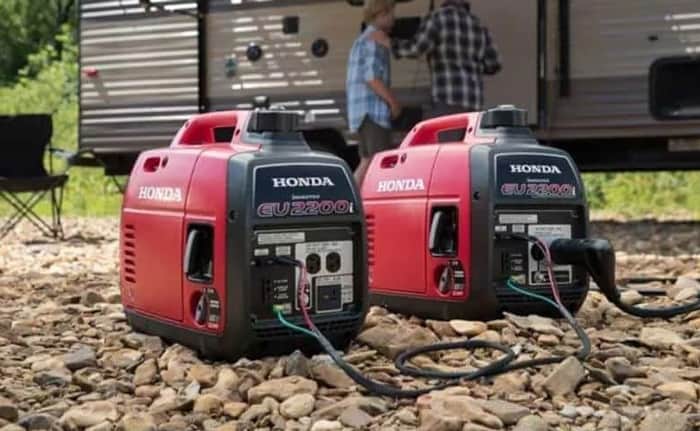
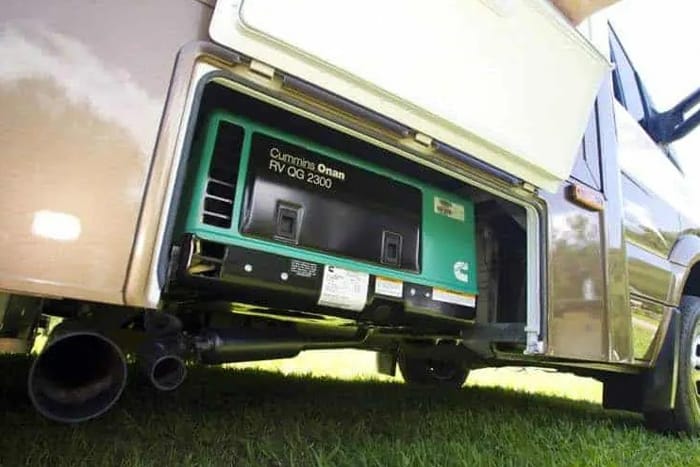
Generator as a Backup
When shore power fails or the campground pedestal proves unreliable, a properly sized generator bridges the gap. A 2,000-watt inverter-type generator handles most coach loads except air conditioning. Running a standard 15,000 BTU rooftop AC unit requires a minimum of 2,800–3,000 watts of generator output at startup, with 1,500–1,800 watts of running draw. Dual-fuel generators provide flexibility when propane is more available than gasoline at a given location. The noise, fuel management, CO safety requirements, and routine maintenance overhead of generator use makes it a practical backup rather than a sustainable primary power source for extended stays at developed campgrounds.
Frequently Asked Questions
Why is an RV plugged in but showing no power inside?
The most common causes are a tripped GFCI outlet, a tripped breaker at either the pedestal or the coach distribution panel, a failed shore cord with an internal break, or a malfunctioning automatic transfer switch in motorhomes. Starting at the pedestal and working inward through each component systematically identifies the fault faster than any other approach.
How do you reset a GFCI outlet in an RV?
Press the TEST button first, then press RESET firmly until it clicks and holds. If the GFCI will not reset, either it is detecting an active fault on the circuit or the outlet itself has failed and needs replacement. Check all GFCI outlets in the coach — bathrooms, kitchen, and exterior compartments — since a single upstream GFCI controls all outlets on its branch.
Can a single tripped breaker cause total loss of power in an RV?
Yes. A tripped main breaker at the top of the distribution panel cuts power to every circuit simultaneously. Breakers that have tripped often sit in a middle position between ON and OFF rather than snapping fully to OFF, which makes them easy to miss on a quick visual check. Push the breaker firmly to OFF before resetting to ON.
What voltage should the shore power inlet read on a 30-amp system?
A correctly wired 30-amp TT-30 pedestal outlet should read between 108V and 132V AC at the hot-to-neutral terminals. Readings below 108V indicate low voltage conditions that can damage sensitive electronics and should trigger an EMS shutoff if one is installed. Readings above 132V indicate high voltage that is equally damaging.
How can someone tell if the RV's transfer switch has failed?
If the pedestal tests live, all coach breakers are in the ON position, and all GFCI outlets reset successfully but the distribution panel still shows no power, the automatic transfer switch is the primary suspect. A multimeter test at the transfer switch output terminals — with shore power connected — confirms whether the switch is passing voltage to the panel.
Is it safe to use a 30-to-50-amp dogbone adapter at a campground?
Dogbone adapters are safe for connecting a 50-amp coach to a 30-amp pedestal, but the total available power drops to 3,600 watts on a single leg. Running the air conditioner and microwave simultaneously will typically trip the pedestal breaker. Adapters should be rated for outdoor use and inspected regularly for heat damage at the connection points, which indicates resistance buildup from corrosion or loose contacts.
How often should RV shore power cords be replaced?
Shore cords do not have a fixed replacement interval, but regular inspection matters more than age. Check for cracking or stiffening of the insulation jacket, heat discoloration at either connector, bent or corroded pins, and any point along the cord where repeated coiling has created a stress concentration. A cord that fails an end-to-end continuity test on any conductor or shows resistance above a fraction of an ohm should be replaced regardless of age.
When the rv plugged in but no power situation strikes, the fix is almost always found in the first five minutes of systematic checking — not in the parts bin.


About Jake Mercer
Jake Mercer spent twelve years behind the wheel as a long-haul trucker, covering routes across the continental United States and logging well over a million miles. That career gave him an unusually thorough education in CB radio equipment — he has tested base station antennas, magnetic mounts, coax cables, and handheld units in real-world conditions where reliable communication actually matters. After leaving trucking, Jake transitioned to full-time RV travel and has since put hundreds of RV accessories through their paces across national parks, boondocking sites, and full-hookup campgrounds from Montana to Florida. At PalmGear, he covers RV gear and accessories, CB radios, shortwave receivers, and handheld radio equipment.
You can get FREE Gifts. Or latest Free phones here.
Disable Ad block to reveal all the info. Once done, hit a button below