RV Gear ›
RV Refrigerator Not Working But Freezer Is? How To Fix It
by Jake Mercer
Have you ever opened your RV fridge expecting a cold drink, only to find everything sitting at room temperature while the freezer compartment is working perfectly fine? It's one of the most common frustrations RV owners run into — and it's almost always fixable without a technician. When in an RV the refrigerator is not working but the freezer is, you're not dealing with a complete system failure. You're dealing with one specific problem: cold air isn't reaching the fridge section. It comes down to a handful of likely causes — frost buildup, a failed thermistor, a leveling issue, or blocked vents — and every one of them is something you can address yourself. This guide walks you through all of it. For more hands-on equipment help, browse our RV gear guides.
Contents
First Things to Check Right Now
Before you grab any tools or start searching for a repair shop, run through these quick checks first. You'd be surprised how often the fix is staring you right in the face — and takes less than five minutes to address.
Thermostat Setting
Your RV fridge has a temperature control dial, and it's remarkably easy to bump it during travel without noticing. Check that it's set to the middle range or higher — typically 3 to 5 on a 1–7 scale. If it's been accidentally turned all the way down, the freezer may still reach freezing temperatures while the fridge section never gets cold enough to do its job.
Also check whether anything inside the fridge is pressing directly against the thermostat probe. A container of leftovers sitting on the sensor can fool it into thinking the fridge is colder than it actually is. Move food away from the probe, adjust the dial, and give it a full 24 hours before drawing any conclusions.
Door Seal Condition
Do the dollar-bill test: close the fridge door on a dollar bill and try to pull it out. If it slides out with no resistance, your door gasket (the rubber seal that runs around the door frame) isn't sealing correctly. A leaky gasket lets warm, humid air in continuously — making it almost impossible for the fridge section to stay at the right temperature.
Start by cleaning the gasket with warm soapy water. Grime and food residue can prevent a good seal even when the rubber itself is fine. If the gasket is cracked, hardened, or deformed, replace it. Replacement gaskets are inexpensive and available for most major RV fridge brands. Most owners can handle the swap in under an hour without any special tools.
Exterior Vent Blockage
RV absorption refrigerators (a type that uses heat and a chemical cycle instead of a compressor to create cold) need consistent airflow through the exterior vent panels on the side of your rig. This airflow removes heat from the back of the cooling unit. When those vents get blocked — and wasp nests are an extremely common culprit — the fridge can't shed heat properly.
The freezer stays cold because it sits closest to the evaporator coils where cooling originates. The fridge section, which depends on the whole heat rejection cycle working correctly, suffers first. Pull the exterior vent cover and take a look inside. A few minutes with a vacuum and a soft brush can completely solve the problem.

Why in an RV the Refrigerator Is Not Working But the Freezer Is
This symptom is actually pretty logical once you understand how these fridges work. The freezer and fridge compartments share one cooling system, so if the freezer is cold, the system is running. The problem is that cold air isn't making it to the fridge section. Here's exactly why that happens — and how to pinpoint the cause quickly.
How Absorption Refrigerators Work
Most RV fridges use absorption refrigeration — a heat-driven process that circulates ammonia, hydrogen gas, and water through a sealed loop to produce cold at the evaporator coils. Unlike your home fridge, there's no compressor motor. Heat from a propane burner or electric heating element drives a continuous chemical cycle that creates cold as a byproduct.
The evaporator — the coldest part of the system — sits closest to the freezer compartment. Cold is generated there first, then it's supposed to flow into the fridge section below, either through natural convection (cold air sinks, warm air rises) or with help from a small circulation fan. When that flow gets interrupted — by frost buildup on the coils, a dead fan, a faulty thermistor (temperature sensor), or a leveling problem — you end up with exactly the situation you're in: cold freezer, warm fridge. The cooling system is working. Something is blocking the result from reaching you.
Quick Diagnosis Table
Use this table to match your specific situation to the most likely cause before you start pulling things apart.
| Symptom | Likely Cause | DIY Fix | Call a Tech? |
|---|---|---|---|
| Fridge warm, freezer cold, fridge ran for months without manual defrost | Frosted evaporator coils | Manual defrost (4–8 hours) | No |
| Fridge warm, freezer cold, defrost didn't fix it | Faulty thermistor | Replace thermistor ($10–$30) | Optional |
| Fridge barely cool, no fan noise from inside | Dead evaporator fan | Replace fan ($15–$25) | Optional |
| Fridge warm, rig parked on uneven ground | RV off-level | Level the RV, wait 4 hours | No |
| Fridge warm, door seal soft, cracked, or dirty | Door gasket failure | Clean or replace gasket ($15–$40) | No |
| Fridge warm on AC power only — works fine on propane | Electric heating element failed | Replace heating element | Optional |
| Fridge warm on propane only — works fine on AC | Burner or igniter problem | Clean or replace burner | Optional |
| Yellow/brown residue at vent or strong ammonia smell | Cooling unit failure (sealed system leak) | None — unit must be replaced | Yes |
DIY Fixes You Can Do Without Special Skills
The three most common causes of this problem are all fixable without advanced mechanical knowledge or expensive tools. Work through these in order — most cases are resolved by the first one.
Manual Defrost — The Most Common Fix
Frost buildup on the evaporator coils is the leading reason in an RV the refrigerator is not working but the freezer is still producing cold perfectly. The evaporator coils sit between the two compartments. When they ice over completely — which happens when humid air gets in or the fridge runs for months without a defrost cycle — cold air simply can't flow through into the fridge section. The ice acts as a wall.
Here's exactly how to do a manual defrost:
- Remove all food from both compartments and transfer it to coolers with ice
- Turn the refrigerator completely off
- Leave both doors open for 4–8 hours — or overnight if you suspect heavy buildup
- Lay towels inside and on the floor in front of the fridge to catch meltwater
- Once fully defrosted, wipe the interior dry, turn the fridge back on, and wait at least 4 hours before reloading
If this solves the problem but the frost comes back within a few weeks, your door gasket is likely letting in moist air — or your defrost thermostat is failing. Both are worth addressing before you end up in the same situation again.
Thermistor Replacement
The thermistor is a small temperature-sensing probe that tells the fridge section when to draw in more cold air from the evaporator. When it fails, the fridge section gets no signal — it just sits warm while the freezer runs perfectly. This is a sneaky cause because nothing looks obviously broken from the outside.
How to test it:
- Locate the thermistor — it's usually a small clip or probe inside the fridge, near the evaporator coil or back wall
- Use a multimeter (a handheld tool that measures electrical resistance) set to ohms
- A working thermistor changes its resistance reading as its temperature changes — warm it in your hand, then cool it in a glass of ice water; the readings should be noticeably different
- If the resistance stays the same regardless of temperature, the thermistor is dead
Replacement thermistors cost $10–$30 depending on brand and model, and they clip in without soldering. This sits at the edge of beginner DIY — comfortable with a multimeter? Do it yourself. Not comfortable? A technician can swap it in under 30 minutes, usually without a service call.
Evaporator Fan Check
Some RV refrigerators use a small evaporator fan to actively push cold air from the freezer section into the fridge section. Without it, you're relying entirely on passive convection — and in a tightly packed fridge, that often isn't enough to maintain proper fridge temperatures.
Listen while the fridge is running. If you don't hear the fan operating, check whether it's obstructed by frost or debris. If the fan blade spins freely but the motor is dead, replacements run $15–$25 from RV parts suppliers and are a direct plug-in swap on most models — no wiring expertise needed.

Preventing This Problem With Regular Maintenance
Most RV refrigerator failures aren't bad luck — they're the result of skipped maintenance. A little consistent attention keeps the system running efficiently and extends its lifespan by years.
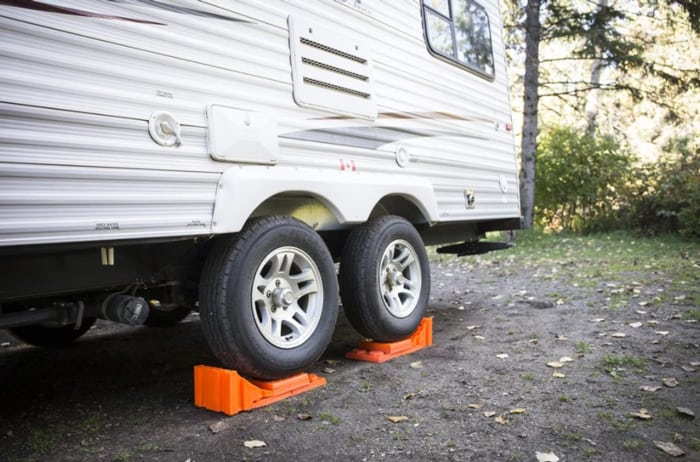
Always Level Your RV Before Running the Fridge
This one surprises a lot of RV owners, but it's non-negotiable. Absorption refrigerators are gravity-dependent systems. The ammonia solution must flow through the sealed loop correctly, and that requires your rig to sit level — within about 3 degrees side-to-side and 6 degrees front-to-back. When you park off-level, the solution pools in the wrong part of the system, circulation breaks down, and cooling becomes unreliable.
If you've been parked on uneven ground and your fridge has been acting up, level the RV first and give it 4 hours to stabilize before doing any other troubleshooting. Many "broken fridge" situations turn out to be nothing more than a level issue. Use a bubble level, a smartphone app, or your RV's built-in leveling system every single time you park.
Running an absorption fridge severely off-level for extended periods can permanently damage the cooling unit — a repair that costs $500–$900 or more. Making leveling a habit every time you set up camp is the single best thing you can do to protect the refrigerator long-term.
Keep the Exterior Vents Clean
At least twice a year, pull the exterior vent panel and clean the burner area, fins, and flue tube. Here's what to look for:
- Wasp nests — the most common find, and even a partial blockage cuts cooling performance noticeably
- Soot on the burner — reduces heat output when running on propane, which means less cooling
- Dust and debris on the condenser fins — reduces how effectively the unit sheds heat
- Spider webs in the flue tube — restricts exhaust airflow and can cause incomplete propane combustion
Use a soft brush and vacuum to clean. Never spray water directly on burner or electrical components. This 15-minute task prevents more performance issues than any other maintenance step.
Load Smart, Not Warm
Packing the fridge completely full blocks air circulation. Leave some space near the back panel so cold air can move around your food — especially on the lower shelves. More importantly, never load warm groceries straight from the store. Absorption fridges are slow to recover from a heat load — a full bag of room-temperature groceries can take 12–24 hours to chill properly, and the fridge section will be the last area to recover.
Pre-chill everything at home before packing it for your trip. Load pre-cold food right before you pull out of the driveway. That one habit alone saves a lot of trips wondering why nothing is cold on day one.
Repair vs. Replace — Making the Smart Long-Term Call
At some point, the repair bill outweighs what the fridge is worth. Knowing where that line is saves you from throwing good money at a problem that isn't going to stay fixed.
Age and Cost Factors
RV absorption refrigerators typically last 10–15 years with proper maintenance. If yours is approaching or past that range and you're looking at a major repair — like a full cooling unit replacement, which runs $500–$900 parts and labor — compare that against what a replacement fridge would cost. A new RV-specific fridge runs $700–$2,000 depending on size, brand, and features.
A practical rule that holds up well: if the repair costs more than 50% of a comparable replacement, replace it. You'll have a manufacturer warranty, better energy efficiency, and fewer surprises for the next decade.
If you're considering going a different direction entirely, our guide on how to replace your RV refrigerator with a standard residential model covers the electrical requirements, space and weight considerations, and whether it's the right move for your specific rig. It's a popular upgrade with some real performance advantages over absorption-style units.
Signs the Cooling Unit Has Failed
The cooling unit is the sealed ammonia loop at the core of an absorption fridge. When it fails, no DIY fix resolves it — you need either a replacement cooling unit or a new fridge entirely. These are the warning signs to watch for:
- Yellow or brown residue visible on the back of the fridge cabinet or around the exterior vent area — this is dried ammonia salt from a leak in the sealed system
- Strong ammonia smell (similar to intense cat urine) — if you detect this, turn the fridge off immediately, ventilate your RV thoroughly, and do not run the unit on propane until you've identified the source
- History of severe off-level operation for extended periods — this is the number one cause of premature cooling unit failure in RV fridges
- No cooling on any power source — if AC power, propane, and DC battery all fail to produce any cold at all, the cooling unit is almost certainly gone
An RV technician can confirm cooling unit failure quickly with a visual inspection. On a newer fridge, a replacement cooling unit is worth pricing out. On an older unit, this is usually the clear signal to go shopping.
Pro Tips for Better RV Refrigerator Performance
Even a perfectly maintained RV fridge has quirks that catch people off guard. These tips come from experienced RVers who've learned them the hard way — so you don't have to.
Pre-Cool at Least 24 Hours Before a Trip
Absorption refrigerators cool down much more slowly than the compressor-based fridge in your home. If you turn yours on the morning you're leaving for a camping trip, you'll be eating marginally cold food the entire first day. Turn it on at least 24 hours in advance — empty, with the thermostat set to a high cooling setting — then load pre-chilled food right before you pull out of the driveway.
This single habit prevents more "warm fridge" frustrations than any repair. It's the most underused tip in RV refrigerator care, and it costs you absolutely nothing.
Match Your Power Source to the Situation
Most RV fridges run on three sources, and each one has a specific sweet spot. Using the wrong one for the wrong situation wastes energy and reduces performance.
- Shore power (120V AC): The most efficient and stable option for extended stays at a campsite with electrical hookups. Use this whenever it's available.
- Propane: Ideal while driving and for boondocking (camping without any electrical hookups). The fridge runs just as well on propane as on AC power — make sure your propane regulator pressure is correct and that the burner lights reliably before every trip.
- 12V DC battery: On most absorption fridges, 12V DC only powers the control board and interior light — not the actual cooling unit. Don't count on battery power alone to keep your food cold while parked.
Protecting your RV's electrical system also protects your fridge's control board and heating element from damage. It's worth knowing how to test whether your RV surge protector is working properly before each trip, and how to keep your surge protector from getting stolen when you're set up at a busy campground.
Add a Thermometer and an Interior Fan
Don't guess at your fridge temperature — measure it. A $10 refrigerator thermometer placed in the fridge section tells you exactly what's happening inside. Your fridge should read 35–40°F (1.7–4.4°C). The freezer should be at 0°F (−18°C) or below. If you're consistently above those targets, something needs attention — and you'll know before food spoils, not after.
Consider adding a small battery-powered fridge fan inside the fridge section. These fans (available for under $20) actively circulate cold air from the freezer compartment down into the fridge, rather than waiting for passive convection to do the job. Many experienced RVers install one as a first-line performance upgrade. Some report a consistent 5–8 degree improvement in fridge temperature without any other changes — especially when the fridge is fully loaded.
Next Steps
- Run a manual defrost right now if your fridge has been operating continuously for more than a few weeks — empty both compartments, turn the fridge off, leave the doors open for 4–8 hours, then restart and check if cooling returns to the fridge section.
- Level your RV if you're parked on uneven ground, then wait 4 hours before evaluating fridge performance — this single step resolves the problem more often than most owners expect.
- Buy a refrigerator thermometer (under $10) and place it in the fridge section to get an accurate temperature reading — your target is 35–40°F, and knowing your actual number tells you whether you have a real problem or a minor one.
- Pull the exterior vent cover and inspect the burner area, fins, and flue tube for wasp nests, soot buildup, or debris — clean what you find and add this inspection to your pre-trip checklist going forward.
- If your fridge is more than ten years old and you're looking at a significant repair, apply the 50% rule: get a quote on the repair and compare it to replacement cost before committing to a fix that may not hold.


About Jake Mercer
Jake Mercer spent twelve years behind the wheel as a long-haul trucker, covering routes across the continental United States and logging well over a million miles. That career gave him an unusually thorough education in CB radio equipment — he has tested base station antennas, magnetic mounts, coax cables, and handheld units in real-world conditions where reliable communication actually matters. After leaving trucking, Jake transitioned to full-time RV travel and has since put hundreds of RV accessories through their paces across national parks, boondocking sites, and full-hookup campgrounds from Montana to Florida. At PalmGear, he covers RV gear and accessories, CB radios, shortwave receivers, and handheld radio equipment.
You can get FREE Gifts. Or latest Free phones here.
Disable Ad block to reveal all the info. Once done, hit a button below