How to Keep Embroidery Floss from Tangling
by Alice Davis
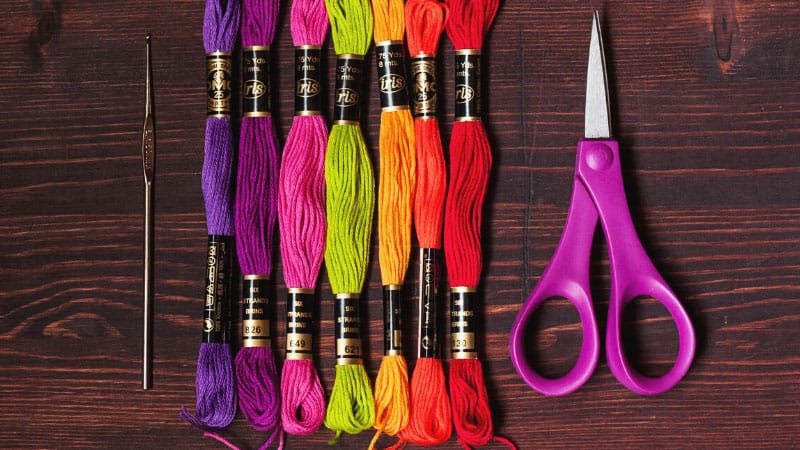
A standard skein of embroidery floss holds about 8 meters (26 feet) of thread split into six delicate strands — and when you're juggling dozens of colors across a single project, tangles pile up fast. If you've wasted 20 minutes fighting a knot instead of actually stitching, you already know how maddening it gets. Knowing how to keep embroidery floss from tangling isn't a luxury skill — it's the foundation of a productive craft session. The good news? The fixes are simple, cheap, and you can start using them today. Browse our full sewing and crafts guide for even more tips on techniques, tools, and projects worth trying.
Whether you stitch cross-stitch, needlepoint, crewelwork, or freestyle embroidery, tangled floss slows everything down and wastes perfectly good thread. A few inexpensive tools and the right daily habits will keep your workspace calm and your stitching smooth. This guide covers it all — from in-the-moment emergency fixes to a long-term storage system that basically runs itself.
Contents
Why Embroidery Floss Tangles in the First Place
Tangling isn't random. It follows predictable patterns. Once you understand why it happens, preventing it becomes second nature — and you'll stop blaming yourself every time a skein turns into a bird's nest.
The Anatomy of Embroidery Floss
Embroidery thread (also called embroidery floss) is made of multiple strands twisted loosely together. A standard skein contains six strands you can separate and recombine in different counts depending on your pattern. That twist gives floss its sheen and smooth texture — but it also makes tangling inevitable when the thread isn't handled with some intention.
Key things to know about floss structure:
- Six strands per skein, loosely twisted together as one unit
- Each strand is itself made of two even finer plies
- Cotton is the most common material — DMC and Anchor are the standard brands
- Silk and synthetic flosses exist and each tangles a little differently
- The twist has a direction — working against it causes kinking and knots fast
Common Tangling Triggers
Most tangles trace back to just a handful of bad habits. Spot these in your own routine and you're already halfway to a tangle-free workspace.
- Pulling from the wrong end of the skein — always pull from the center loop, not the outside tail
- Working with strands that are too long — anything over 18 inches is asking for trouble
- Letting your needle spin freely — it twists the thread tighter with every stitch you pull through
- Leaving loose floss in an open basket or bag — it wraps around itself and everything else in there
- Reusing thread that's already been knotted — the twist structure is damaged and it tangles again easily
- Threading more strands than you need — extra strands flap around and catch on each other mid-stitch
If you also use a sewing machine for other projects, good maintenance habits carry over naturally. Just like keeping your machine clean stops jams before they start — see our guide on how to clean your sewing machine — keeping your floss tidy stops tangles before they form.
How to Keep Embroidery Floss from Tangling Right Now
You don't need a complete system overhaul to see results today. These quick fixes work immediately — even if you're already mid-project and already frustrated.
Before You Start Stitching
Five minutes of prep before you pick up your needle saves 30 minutes of untangling later. Make these steps automatic every single session:
- Cut shorter strands. Never cut more than 18 inches (about 45 cm) at a time. Shorter strands don't have time to twist on themselves during stitching.
- Pull from the center of the skein. Find the end tucked into the center loop and pull it out slowly. Yanking from the outside tail creates instant tangles.
- Separate your strands one at a time. Don't grab all six at once if your pattern only calls for two. Pull each individual strand upward slowly, then combine the number you need.
- Drop and let it untwist. Hold your needle in the air and let it dangle freely for two seconds. The floss will naturally untwist a little before you begin.
- Slightly dampen your fingertips. A tiny bit of moisture smooths cotton fiber and cuts down on static, which is a surprisingly common cause of fine-strand tangling.
Pro Tip: The "drop and spin" trick is your best in-session tool. Every few stitches, hold your hoop up and let the needle hang free — gravity does the untwisting so you don't have to think about it.
Mid-Project Rescue Moves
Already in a tangle? Don't panic and don't yank. Yanking tightens the knot. Here's how to get out of it without losing the thread:
- Insert a pin or tapestry needle into the center of the knot and gently wiggle it loose from the inside out
- Work from both ends of the tangle at the same time, moving slowly toward the knot's center
- If the knot is extremely tight, just clip it out and restart with a fresh strand — fighting a bad knot wastes more thread than cutting does
- Use strong task lighting — most tangles look far worse in dim conditions than they actually are
- Lay the work flat on a table to get better visual access and leverage on a stubborn knot
Just like hemming jeans requires patience and a deliberate technique rather than brute speed, untangling floss is about slow, steady, gentle pressure. Force always makes it worse.
The Right Tools for Tangle-Free Stitching
The right gear eliminates most tangling problems at the source. You don't need anything expensive — just the right things for the job. Here's what actually moves the needle (pun intended).
Must-Have Organizers
These are the non-negotiables. Every stitcher who takes their craft seriously needs at least one of the following:
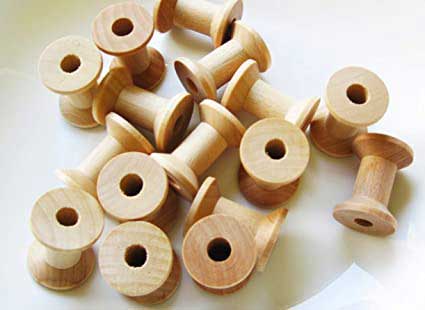
- Plastic bobbins (also called thread cards) — wind your floss onto small plastic bobbins and slot them into a storage case. Each color stays separate, labeled, and completely tangle-free. Standard DMC-size bobbins are cheap and universally compatible.
- Floss drop cards — cardboard cards with a notched slot that hold a looped skein in place. Great for active projects where you need several colors accessible at once.
- Zippered project bags — use one bag per project, with separate pockets or small envelopes for each color in play. It prevents cross-project contamination and keeps everything in one place when you pick it up again.
- A thread caddy or ring — holds multiple pre-cut lengths of floss neatly during an active session so they don't pile up on your lap or tangle in the hoop.
Nice-to-Have Gadgets
These aren't required for beginners, but once you're putting in regular hours at the hoop, these upgrades make a real difference:
- Needle minders — small magnetic discs that park your needle on the fabric when you're not actively stitching. No dangling needle dragging thread across your work.
- Thread conditioner — a waxy product (brands like Thread Heaven or Thread Magic) that you draw thread through before stitching. It reduces friction dramatically and cuts tangling by a significant margin.
- Beeswax block — the old-school version of thread conditioner. Very cheap, lasts effectively forever, and works excellently on cotton floss. Many experienced stitchers swear by it over modern conditioners.
- Rotating hoop stand — keeps your hoop stable at the perfect angle so both hands are free to manage floss positioning properly rather than gripping the hoop.
If you also enjoy heat press or vinyl crafts, you'll recognize this kind of tool-selection thinking. The same process of finding the right gear for the job applies when you learn how to apply heat transfer vinyl with an iron — the right tool at each step prevents mistakes and saves time.
Proven Techniques That Keep Floss Smooth
Technique matters more than tools. Good habits prevent tangles at the source — before they ever get a chance to form. These methods are used by experienced stitchers for a reason: they work.
How to Cut and Wind Properly
How you handle floss before it touches your needle determines most of your tangling fate. Follow this sequence every time you start a fresh thread:
- Cut your working strand to 16–18 inches maximum. Go even shorter — 12 inches — for very fine detail work or when working with slippery silk floss.
- Separate each individual strand by pinching near the top and pulling upward slowly. Don't rush this. A sudden jerk here causes an immediate tangle in the other strands.
- Re-combine the number of strands your pattern calls for. Lay them alongside each other going in the same direction before threading your needle.
- Thread your needle and leave only a short tail — about an inch. Long tails catch on fabric and neighboring threads constantly.
- When winding onto a bobbin for storage, wrap firmly but not overly tight. Too-tight winding warps the twist of the thread and causes it to behave strangely when you use it later.
If you're building out your embroidery skills alongside machine work, appliqué with an embroidery machine is a natural next skill to add — and the thread management discipline you build by hand carries over directly to machine work.
Working Methods That Prevent Knots
These in-session habits reduce active tangling to almost nothing once they become automatic:
- Use the "railroading" technique. After pulling a stitch through, use your needle to separate and lay each strand flat before you pull the next stitch. Keeps strands parallel instead of twisted around each other.
- Work with the thread's natural twist. Pull in the direction the thread wants to go. If it feels resistant or starts bunching, flip your needle over and try the other direction.
- Drop your needle every 5–7 stitches. Let it hang freely and untwist. Build this into your rhythm — do it automatically, like a breath between sentences.
- Park unused threads. When you're switching colors mid-section, bring the inactive thread up through the fabric well above the design area. This "parking" technique keeps it out of the way and unknotted until you need it again.
- Avoid long jumps across the back. Don't carry thread more than about an inch across the back of the fabric. If you need to travel farther, end the thread and start a new one. Long jump threads catch on everything.
- Never start with a knot. Use a loop start or a waste knot instead. Traditional knots on the back catch other threads and create tangles you can't see until they've tightened.
Warning: Starting your thread with a standard knot is the single biggest tangle mistake beginners make. A loop start is faster to learn than you think, and it eliminates a whole category of back-of-fabric snags entirely.
The methodical, step-by-step mindset that makes these techniques click is the same kind of thinking that helps with other crafts — like learning how to connect a vinyl cutter to your computer properly before diving into a big project.
Building a Long-Term Floss Organization System
A one-time cleanup doesn't last. You need a system — one that runs on autopilot after a little upfront setup. Here's how to build something that actually sticks long-term.
Setting Up Your Floss Library
A proper floss library means you can pull any color in seconds and put it back just as fast. No digging, no dumping bags out, no mystery tangles. Here's the setup:
- Buy a numbered bobbin case. Cases designed for 300 or more bobbins are common and affordable. Dedicate one slot per DMC color number — this makes finding colors instant.
- Wind all your existing skeins onto bobbins at once. Yes, all of them. Block out an afternoon, put on a show, and get it done in one shot. You will never regret it.
- Create an "in use" section. Pull the bobbins for your current project into a small travel case or clear ziplock bag. When the project finishes, return them to the main case. This prevents active-project floss from getting jumbled with your reserves.
- Choose one sorting method and commit to it. Store by color family (all reds together, all blues together) or sort numerically by DMC number. Either works. Mixing both systems is where chaos sneaks back in.
A dedicated craft space makes all of this much smoother. If you're building out a real workspace, knowing practical home setup skills helps — even something like how to install a utility sink next to your washer can be relevant if you want a wet media station nearby for dyeing or fabric prep.
Labeling and Tracking Your Colors
Running out of a critical color mid-project because you didn't track your inventory is as frustrating as a bad tangle. Fix this now before it happens:
- Write the DMC color number directly on each bobbin using a permanent marker, or apply a small sticky label
- Keep a simple spreadsheet or notebook listing colors you own, colors running low, and colors you need to reorder
- Tape the original paper skein band to the back of the bobbin if your case design allows it — it includes dye lot information you may need for a future matching purchase
- Take a photo of your full case once a month — it's the fastest reference possible when you're shopping in a craft store
- Mark your "last one" bobbins with a dot of red marker so you always know when you're down to your final skein of a color
The same organized supply mindset helps with other crafts too. If you also do heat press work, you'll find that the prep discipline you build for floss management directly cuts your setup time when you heat press a hat — knowing where everything is before you start is half the battle.
What You'll Actually Spend to Get Organized
You genuinely don't need to spend much. Most of the best tangle-prevention tools cost under $20, and a complete starter system runs under $40. Here's a realistic breakdown so you know exactly what you're working with.
Budget-Friendly Picks
Start here if you're new to organizing or working with a tight budget. These items deliver the highest value per dollar spent:
- Plastic bobbins, 100-pack — roughly $5–$8. The single best investment in this whole list. Wind your floss, slot into a case, done.
- Basic bobbin storage case (300-slot) — $10–$15. Holds your entire collection and keeps every bobbin visible at a glance.
- Zippered project bags — $2–$5 for a multipack. Use one per project, label it, and your active projects stay completely separated.
- Beeswax block or budget thread conditioner — $3–$6. Lasts months to years. Massively underrated for the price.
Worth the Splurge
Once you're putting in regular hours at the hoop, these upgrades genuinely improve the experience and they're worth the extra spend:
- Quality multi-tray craft organizer case — $25–$45. Far better than a shoebox or a bin. A good clasp case keeps everything dust-free and portable.
- Needle minders — $8–$20 depending on design. Functional and often beautiful. Many stitchers collect them.
- Rotating hoop stand — $30–$60. Your wrists and shoulders will genuinely thank you during any session over an hour.
- Premium thread conditioner (Thread Heaven or Thread Magic) — $8–$12. More consistent than beeswax and leaves no residue on light-colored fabric.
| Item | Budget Option | Premium Option | Priority Level |
|---|---|---|---|
| Plastic Bobbins (100-pack) | $5–$8 | $12–$18 (wood or metal) | Essential — buy first |
| Bobbin Storage Case (300-slot) | $10–$15 | $30–$50 | Essential |
| Thread Conditioner | $3–$6 (beeswax) | $8–$12 (Thread Heaven) | Strongly Recommended |
| Project Bags | $2–$5 (ziplock) | $15–$25 (canvas pouches) | Essential |
| Needle Minder | $5–$8 | $15–$25 | Nice to Have |
| Rotating Hoop Stand | $20–$30 | $50–$80 | For Regular Stitchers |
| Multi-Tray Organizer Case | $12–$18 | $35–$50 | Recommended Upgrade |
Total startup cost for a solid, complete system: well under $40 if you go the budget route. You'll spend far more on floss itself than on the organizational tools — and that's exactly how it should be. The tools are a one-time buy. The floss is the craft.
Final Thoughts
Mastering how to keep embroidery floss from tangling really comes down to three things: shorter working strands, proper storage on bobbins, and consistent in-session habits like dropping your needle to untwist every few stitches. Start with a 100-pack of bobbins and a basic storage case — that one change alone will transform your setup — then layer in thread conditioner, good cutting technique, and a project bag system as you go. Head over to our sewing and crafts section, pick up the gear that fits your budget, and get back to the part that actually matters: making something beautiful.


About Alice Davis
Alice Davis is a crafts educator and DIY enthusiast based in Long Beach, California. She spent six years teaching textile design and applied arts at a community college, where she introduced students to everything from basic sewing techniques to vinyl cutting machines and heat press printing as practical, production-ready tools. That classroom experience means she has put more sewing machines, embroidery setups, Cricut systems, and heat press units through real project work than most reviewers ever will. At PalmGear, she covers sewing machines and embroidery tools, vinyl cutters, heat press gear, Cricut accessories, and T-shirt printing guides.
You can get FREE Gifts. Or latest Free phones here.
Disable Ad block to reveal all the info. Once done, hit a button below