How to Clean a Dryer Vent with a Leaf Blower: Step by Step
by Sandra Holt
A leaf blower cleans dryer vents effectively — and in most cases, faster than any dedicated brush kit. The high-velocity airstream dislodges compacted lint from duct walls and drives it straight out the exterior exhaust cap in a fraction of the time manual methods require. For anyone learning how to clean dryer vent with a leaf blower, the key variables are a proper intake seal, the correct nozzle attachment, and a clear path from the dryer connection to the outside termination point.
Dryer vent maintenance ranks among the most neglected — and most consequential — tasks in routine home upkeep. The U.S. Fire Administration identifies clogged dryer vents as a leading contributor to residential fires, making this a safety issue, not just an efficiency concern. Homeowners managing home appliances day-to-day often underestimate how quickly lint accumulates inside duct runs, especially in homes with longer vent paths or high laundry volume. This guide covers how to recognize when cleaning is overdue, how the leaf blower method compares to alternatives, and how to execute the process correctly from start to finish.

Contents
Warning Signs the Dryer Vent Demands Immediate Cleaning
Most homeowners wait for an obvious malfunction before addressing dryer vent buildup. By that point, efficiency has already declined significantly — and fire risk has climbed. Recognizing early indicators saves money and prevents hazards before they escalate.
Performance Indicators Inside the Laundry Room
Performance degradation is typically the first signal. The following symptoms point directly to a restricted vent:
- Extended drying cycles: Clothes that previously dried in 45 minutes now require 70–90 minutes or multiple full cycles.
- Excessive heat buildup: The dryer exterior, surrounding cabinetry, or nearby walls feel unusually hot during operation.
- Damp or musty clothes after a full cycle: Poor airflow prevents moisture from fully evacuating the drum.
- Lint depositing back onto clothing: Backflow pressure deposits lint onto garments rather than exhausting it through the duct system.
- The lint trap fills faster than normal: When downstream venting is obstructed, lint accumulates at the trap rather than passing through the system as designed.
Any single symptom warrants an inspection. Multiple symptoms together indicate a significant blockage requiring action before the next laundry cycle.
Safety Red Flags That Cannot Be Ignored
Beyond performance, certain signals indicate an active safety hazard requiring immediate shutdown and inspection:
- Burning smell during operation: Lint residue on duct walls or near the heating element ignites easily. This is a stop-immediately situation — do not continue the cycle.
- Visible debris at the exterior exhaust cap: Lint protruding from or blocking the cap signals a fully saturated vent run. The blockage extends the full length of the duct.
- The exhaust cap damper flap stays closed during operation: The flap opens under normal exhaust pressure. A flap that stays shut indicates near-total blockage.
- Condensation around the dryer connection or inside the laundry room: Trapped humid air that cannot exhaust creates moisture problems beyond the dryer itself.
Restricted airflow is a recurring failure mode across heating and ventilation appliances. The same systematic diagnostic patience that guides homeowners troubleshooting an RV furnace not working applies directly here — trace the blockage point methodically before attempting any remedy.
Leaf Blower vs. Traditional Dryer Vent Cleaning Methods
Multiple methods exist for clearing dryer vents. The leaf blower approach is not universally superior, but it outperforms alternatives in specific, common situations that affect a large percentage of households.
Speed, Reach, and Effectiveness Compared
| Method | Completion Time | Effective Vent Length | Equipment Cost | DIY Friendly | Mess Management |
|---|---|---|---|---|---|
| Leaf Blower | 15–30 min | Up to 25 ft | $0–$20 (adapter only) | Yes | Debris exits outside |
| Flexible Brush Kit | 45–75 min | Up to 12 ft | $20–$40 | Yes | Lint enters the room |
| Vacuum with Attachment | 30–60 min | Up to 6 ft | $15–$30 | Yes | Moderate, partially captured |
| Compressed Air Kit | 20–40 min | Up to 15 ft | $25–$60 | Moderate | Debris exits outside |
| Professional Service | 60–90 min | Unlimited | $100–$200 | No | Fully controlled |
Cost and Equipment Accessibility
For most homeowners, the leaf blower is already in the garage. The only additional purchase is a dryer vent adapter or flexible coupling that seals the blower nozzle against the duct opening — typically available at hardware stores for under $15. This makes the method essentially zero-marginal-cost for anyone who already owns a leaf blower.
Brush kits reach into duct runs but lose effectiveness beyond 10–12 feet. Flexible sections and elbows stop physical brushes in their tracks. Airflow, however, follows duct geometry automatically — a 90° elbow presents no meaningful resistance to a properly sealed blower. For vent runs with multiple bends or runs exceeding 12 feet, the leaf blower outperforms every manual method.
How to Clean Dryer Vent with a Leaf Blower: Tools and Full Process
Executing this correctly requires deliberate setup. Skipping any preparation step reduces effectiveness and creates exactly the mess this method is designed to avoid.
Required Equipment and Setup
Gather the following before starting:
- Electric or gas leaf blower — cordless models work well; 200+ CFM output is the effective threshold for routine cleaning
- Dryer vent cleaning adapter or flexible coupling sized to fit both the blower nozzle and the 4-inch duct opening
- Duct tape or self-fusing silicone wrap to seal any gaps at the connection point
- Flat-head screwdriver or nut driver for hose clamp removal
- Work gloves and eye protection
- Garbage bag and rubber band or tape to seal around the exterior exhaust cap
- Vacuum cleaner with a crevice tool for final cleanup at the dryer intake collar
Adapters marketed specifically as dryer vent cleaning attachments attach to the blower nozzle and seal against standard 4-inch duct openings. A tight seal at the intake is non-negotiable — any gap bleeds airflow pressure and reduces clearing force inside the duct run.
Step-by-Step Cleaning Procedure
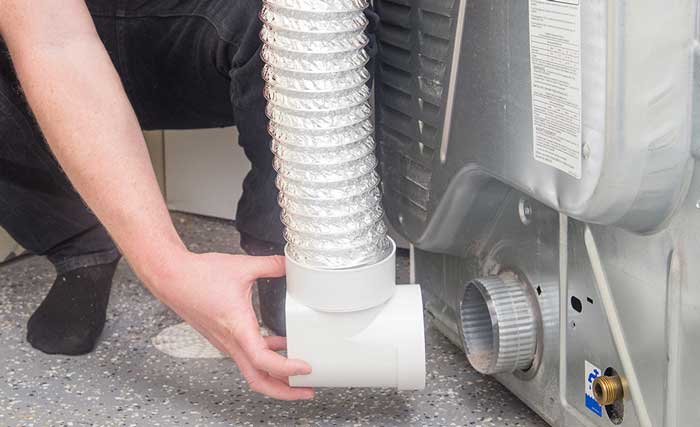
- Disconnect the dryer: Unplug electric dryers from the wall outlet. For gas dryers, turn off the gas supply valve at the shutoff behind the unit. Pull the dryer forward from the wall to access the flexible duct connection at the rear panel.
- Detach and inspect the flexible hose: Loosen the clamp connecting the flexible duct to the wall vent collar and remove the hose completely. Inspect it for tears, kinks, or heavy interior lint buildup. A heavily damaged section requires replacement before proceeding — blowing through a compromised hose exhausts pressure into the wall cavity instead of down the duct.
- Cover the exterior exhaust cap: Walk outside and loosely secure a garbage bag around the exterior vent termination using tape or a rubber band. This catches ejected lint and prevents it from depositing on siding, landscaping, or exterior surfaces.
- Attach the adapter to the blower nozzle: Fit the dryer vent cleaning adapter onto the leaf blower nozzle. Seal the adapter-to-duct connection with duct tape at the wall collar. The connection must be air-tight — test by hand before starting the blower.
- Run the blower at full power: Start the leaf blower at maximum output. Hold the connection firmly in place for 30–60 continuous seconds. The pressure wave travels the full duct length, stripping lint from interior walls and driving it out the exterior cap. Run a second 30-second pass to confirm clearance.
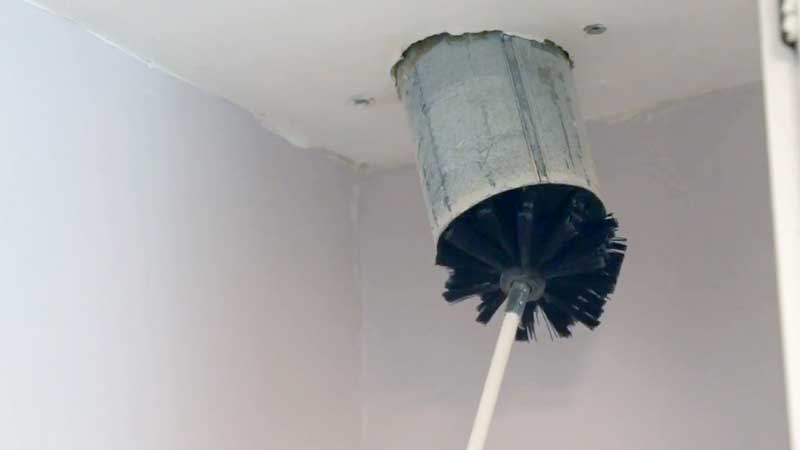
- Inspect the exterior cap: Walk outside, remove the garbage bag, and check that the damper flap swings freely with light pressure. Clear any residual lint from the cap louvers manually. Replace any cap that uses interior screens — screened caps restrict exhaust airflow and fail to meet current installation standards.
- Vacuum the wall duct collar: Use a vacuum crevice tool to remove any lint that settled near the intake collar during the blower pass. Wipe the interior of the collar with a dry cloth before reattaching the flexible hose.
- Reconnect and run a test cycle: Reattach the flexible hose with a new clamp if the existing hardware shows corrosion or deformation. Push the dryer back into position without kinking the hose — a crushed section behind the unit is the most common oversight at this stage. Restore power and gas, then run a full timed cycle to confirm normal airflow, heat distribution, and cycle duration.
Mistakes That Undercut the Cleaning Process
The leaf blower method is straightforward in principle. In practice, a handful of consistent errors reduce effectiveness — or introduce problems that did not exist before the job started.
Preparation and Setup Errors
- Failing to seal the blower-to-duct connection: A loose or partial seal routes most of the airflow out at the connection point rather than down the duct. The result is noise and vibration without meaningful clearing action. Every gap must be eliminated before starting the blower.
- Skipping the exterior cap cover: Ejected lint disperses over a wide area — siding, trim, landscaping, and nearby surfaces all collect debris. The 90 seconds spent setting up the bag saves 20 minutes of cleanup.
- Leaving the dryer powered while moving it: Both electric and gas dryers present serious hazards when moved without first disconnecting power and fuel. This step is not optional and not a formality.
- Not inspecting the flexible hose before attachment: Cracked, crushed, or accordion-style vinyl hose tears under sustained blower pressure. Foil-only flexible duct fails at weak points and exhausts airflow into the wall cavity. Inspect before pressurizing — replace when in doubt.
Technique Mistakes During the Procedure
- Running the blower at partial power: Lower CFM output fails to dislodge compacted lint formations. Maximum rated output sustained for at least 30 continuous seconds is the effective minimum threshold.
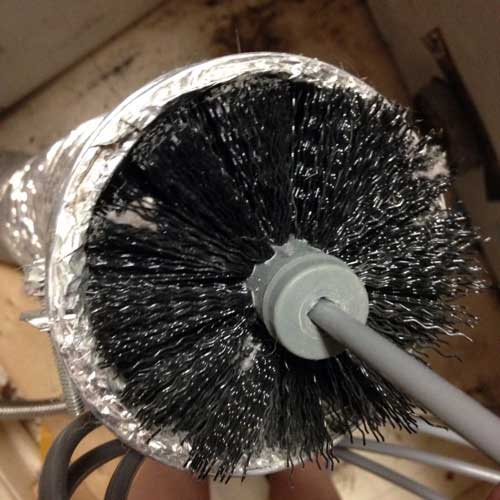
- Leaving the flexible hose attached during the blower pass: The corrugated ridges inside standard accordion-style flexible hose trap lint efficiently. Blowing through the rigid duct while the flexible section remains connected means the hose immediately recontaminates the cleared duct on reinstallation. Remove and clean the flexible section independently — or replace it with smooth-bore semi-rigid aluminum, which accumulates far less material.
- Assuming a single pass handles years of buildup: One 30-second pass clears loose debris reliably. Dense, compacted buildup from prolonged neglect requires two or three passes, with a brief vacuum between passes to remove material that settles near the intake collar.
- Ignoring the exterior cap condition: A damaged, sticky, or screen-equipped exterior cap restricts exhaust pressure regardless of duct cleanliness. Screened caps are non-compliant with current codes and replace with louvered damper models immediately.
- Reinstalling with a kinked flexible duct: Any restriction in the flexible hose section negates the cleaning work entirely. A crushed section behind the dryer — the most common reinstallation error — creates the same flow restriction that necessitated cleaning in the first place.
This kind of component-by-component discipline mirrors the systematic approach that effective appliance repair demands across the board — whether diagnosing an RV water pump that has stopped working or tracing a dryer airflow failure back to its root cause.
Scenarios Where the Leaf Blower Method Excels
The leaf blower is not the solution to every dryer vent problem. Extreme compaction — years of unaddressed buildup hardened into near-solid blockages — sometimes requires a professional auger. But in the conditions that describe most residential installations, no other DIY method matches its speed or reach.
Vent Length and Configuration Factors
The leaf blower method delivers its clearest advantage in these installation types:
- Long vent runs (10–25 feet): Brush kits require segment-by-segment insertion and extraction, losing cleaning aggressiveness at each rod connection. Airflow covers the entire length in one pass, uniformly.
- Multiple elbows or directional bends: Physical brushes slow down and lose contact with duct walls at each elbow. Airflow follows duct geometry with minimal loss through standard 45° and 90° bends.
- Wall-routed or ceiling-routed ducts: Ducts routed through interior walls or ceiling cavities are physically inaccessible for brush cleaning without opening drywall. Airflow-based clearing is the only viable DIY option for these configurations.
- Prevention-phase maintenance on a regular schedule: For vents cleaned annually before heavy buildup accumulates, the blower method removes loose lint deposits quickly and thoroughly. It is most effective as a maintenance tool rather than a remediation tool.
Maintenance Frequency and Scheduling
Cleaning frequency depends on household-specific usage patterns:
- Standard household (4–8 loads per week): Annual cleaning is sufficient. The leaf blower method handles this volume without supplemental brush work.
- High-volume household (8+ loads per week): Semi-annual cleaning. A brush inspection after the blower pass confirms full clearance on high-traffic vents.
- Gas dryer users: Gas dryers produce more moisture than electric models, accelerating lint adhesion to duct walls. Semi-annual cleaning is advisable regardless of load volume.
- Pet owners: Pet hair accelerates lint trap and duct buildup significantly. Cleaning every 3–6 months depending on household pet population prevents premature compaction.
Consistent scheduling — the kind that prevents emergency repairs rather than reacting to them — is a principle that applies across every household system. Homeowners who manage RV awning maintenance on a regular calendar recognize this immediately: neglect compounds into expensive failures, and a 30-minute annual investment protects against a far larger consequence.
Frequently Asked Questions
Can any leaf blower clean a dryer vent, or does it require specific features?
Most leaf blowers rated at 150 CFM or higher output work effectively. Electric corded, cordless battery-powered, and gas models all perform the task adequately when paired with a proper sealing adapter. Higher CFM output improves effectiveness on longer runs and dense buildup, but is not strictly necessary for routine annual cleaning on standard 10–15 foot duct runs.
Is it safe to use a leaf blower on flexible aluminum or vinyl dryer vent hose?
Standard semi-rigid aluminum flex duct handles leaf blower pressure without issue. Foil-only flexible hose — the thin silver accordion type — tears under sustained pressure if already weakened by age, heat cycling, or physical damage. Inspect the flexible section before applying pressure and replace it with semi-rigid aluminum if any cracks, holes, or crushing are present.
Which direction should the leaf blower push air — from the dryer end or the exterior cap?
Always blow from the dryer end toward the exterior exhaust cap. This follows the natural direction of designed airflow and drives debris toward the outside. Blowing from the exterior inward forces lint deeper into the duct system, compacts it near the dryer connection, and deposits loose material inside the laundry room.
How often does a dryer vent need cleaning to prevent fire hazards?
Annual cleaning covers most standard households running 4–8 laundry loads per week. High-volume households, pet owners, and gas dryer users benefit from cleaning every 6 months. Performance indicators — extended cycle duration, excessive heat at the dryer exterior, reduced exhaust airflow at the cap — are reliable signals that cleaning is overdue regardless of the scheduled interval.
A clean dryer vent costs thirty minutes once a year — a blocked one costs a house fire.


About Sandra Holt
Sandra Holt spent eight years as a project manager for a residential renovation company in Portland, Oregon, overseeing kitchen and bathroom remodels from initial estimate through final walkthrough. That work exposed her to an unusually wide range of home equipment — from HVLP spray guns and paint sprayers on the tools side to range hoods, kitchen faucets, and countertop appliances on the appliance side. After leaving the trades, she moved into consumer product writing, bringing the same methodical, hands-on approach she used to evaluate contractor-grade tools to everyday home gear. At PalmGear, she covers kitchen appliances, home tools, paint and finishing equipment, and cleaning gear.
You can get FREE Gifts. Or latest Free phones here.
Disable Ad block to reveal all the info. Once done, hit a button below