Basic Sewing Machine Repair and Maintenance for Home Sewers
by Alice Davis
A fellow crafter on our team sat down one morning ready to finish a quilt border, only to find the machine skipping stitches on every third pass — a small problem that derailed the entire afternoon's work. After a quick inspection, the culprit turned out to be a needle that had been in service three months past any reasonable lifespan, a fix that cost nothing and took under two minutes. That moment is what drove our team to take sewing machine repair and maintenance seriously, and the findings have shaped every guide we have published on the subject since.
Home sewers who invest time in understanding their machines report fewer project interruptions, longer machine lifespans, and measurably better stitch quality, according to repair technicians and sewing educators who have shared data with our team. Our coverage at PalmGear spans sewing crafts and vinyl projects through to complex equipment troubleshooting, and in that breadth we have consistently found that machine care is one of the highest-return habits any crafter can build. The sections below cover the full picture, from basic theory through hands-on weekly routines.
Contents
The Case for Knowing Your Machine
Most people treat a sewing machine like a sealed appliance — something to plug in and run until it stops working, then drop at a repair shop without further thought. That assumption is expensive and, in many cases, entirely avoidable. A sewing machine is a precision mechanical device with a small set of high-wear components, and understanding those components is the essential first step toward preventive care that most home sewers can handle entirely on their own.
Why Preventive Care Pays Off
Standard tune-ups at repair shops run between $75 and $150, and many of the problems that reach that stage began as a missed cleaning session or an improperly adjusted tension setting. Our team has documented multiple cases where a five-minute lint-removal session resolved a skipped-stitch problem that had been misdiagnosed as a mechanical fault requiring a shop visit. The return on maintenance time is, by almost any measure, exceptional — the highest effort-to-outcome ratio we have seen across all the household equipment categories we cover at PalmGear.
How These Machines Actually Work
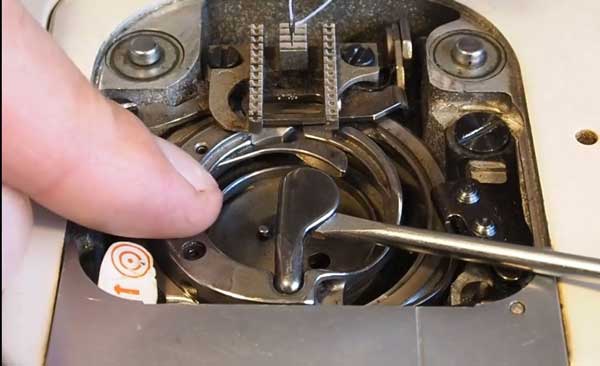
The core mechanism is straightforward: a needle carries thread down through fabric while a rotating hook in the bobbin area catches that thread and loops it around the bobbin thread, forming a lockstitch. At typical home-machine speeds of 400 to 900 stitches per minute, the mechanical load on the hook and needle bar (the vertical shaft that drives the needle) accumulates rapidly, which explains why lint removal and lubrication are load-management tasks rather than optional extras.

What Home Sewers Can Handle vs. What Needs a Pro
Fixes Anyone Can Learn
The following repairs sit firmly within reach of most home sewers, requiring no specialized tools and minimal technical knowledge to execute correctly:
- Needle replacement — recommended every 8–10 hours of sewing time, or immediately after hitting a pin
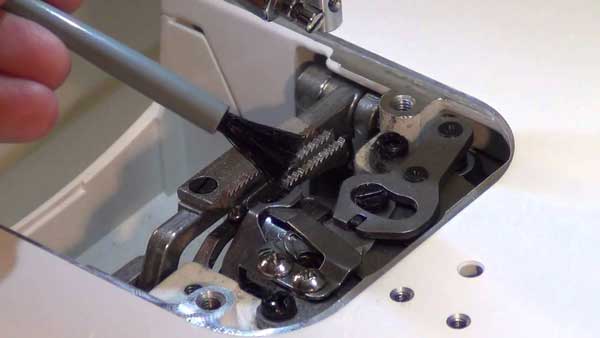
- Bobbin case cleaning and lint removal from the feed dog (the ridged teeth that grip and advance fabric) area
- Thread re-routing after a jam or the tangled underside knot known as a bird's nest
- Tension adjustment using the machine's built-in dial or digital interface
- Presser foot swaps for different fabric types or decorative stitch styles
- Belt inspection on older machines — a visual check for cracking or surface glazing takes under two minutes
| Maintenance Task | Recommended Frequency | Skill Level | Time Required |
|---|---|---|---|
| Lint removal (bobbin area) | Every project | Beginner | 5 minutes |
| Needle replacement | Every 8–10 sewing hours | Beginner | 2 minutes |
| Throat plate cleaning | Weekly | Beginner | 10 minutes |
| Hook race oiling | Monthly | Intermediate | 5 minutes |
| Tension calibration test | Monthly | Intermediate | 10 minutes |
| Full exterior wipe-down | Every 6 months | Beginner | 20 minutes |
| Hook timing adjustment | As needed (annually) | Professional only | 60+ minutes |
When the Repair Shop Is the Right Call
Timing mechanism adjustments, hook timing re-synchronization, motor replacement, and circuit board repairs all require specialized tools and factory calibration specifications that are not publicly available for most consumer machines. Our team's position on this is unambiguous: these are professional jobs, not weekend projects for home sewers. Attempting hook timing adjustment without proper training risks permanently misaligning the stitch-forming mechanism, which means every single stitch produced afterward is compromised in ways that can be difficult to detect without test equipment.
Clearing Up Common Sewing Machine Repair and Maintenance Myths
Myth: A New Machine Doesn't Need Maintenance
Factory lubrication is applied conservatively at the assembly line, and some machines arrive at retail with insufficient oil in key bearing points — a fact that several repair technicians have confirmed to our team through direct interviews. Our recommendation is to run a new machine for two to three hours on scrap fabric before beginning any real project, then clean and inspect the bobbin area thoroughly, because new components shed fine particles during the break-in period and lint accumulates faster than most people anticipate.
Myth: More Oil Is Always Better
Over-oiling is a documented cause of fabric staining and accelerated lint accumulation, and our team treats it as seriously as under-oiling when diagnosing machine problems. Most modern home machines require only one to two drops of sewing machine oil — a clear, lightweight mineral oil — applied to the hook race (the circular track the rotating hook rides in) every few months under normal use. The precision discipline required here mirrors what our team covers in the common heat press problems and fixes guide: the right amount of anything consistently outperforms an excess of it.
Our team's standing warning: never use compressed air inside a sewing machine — it forces lint and debris into bearing surfaces and creates damage that often requires a professional to correct, a problem entirely avoidable with the small stiff brush that ships with most machines.
Our Step-by-Step Sewing Machine Maintenance Routine
Weekly Cleaning Tasks
A clean machine outperforms a lubricated dirty one in our team's consistent experience, and the sequence below is what we follow after every major project or roughly every four to six hours of run time:
- Power off and unplug the machine — non-negotiable before touching any internal component, regardless of how routine the task feels.
- Remove the needle, presser foot, and throat plate (the flat metal plate surrounding the needle aperture in the base of the machine).
- Use the small stiff brush that ships with most machines to sweep lint from the feed dogs and the entire bobbin cavity, working from the center outward.
- Wipe the bobbin case with a dry lint-free cloth; compressed air is specifically excluded from our process because it drives debris deeper into the mechanism rather than clearing it.
- Reinstall the throat plate, insert a fresh bobbin wound evenly without overfilling, and re-thread the machine from scratch to reset mechanical tension memory.
Monthly and Seasonal Care
Once a month, or after completing any large batch project like a quilt or a run of garments, our team adds lubrication and runs a tension test on scrap fabric before returning to real work. Applying one drop of sewing machine oil to the hook race, then running the machine at low speed for thirty seconds, allows the oil to distribute evenly before any fabric contact occurs. Inspecting the underside of that test swatch for equal tension on both the top and bobbin threads confirms correct calibration and establishes a reliable baseline for identifying drift in future sessions.
Small Habits That Prevent Most Breakdowns
Needle Discipline
The single highest-impact sewing machine maintenance habit is needle replacement, and our team is categorical: a fresh needle at the start of every project, with no exceptions based on how much the previous session seemed to go. A dull needle drags through fabric rather than piercing cleanly, which stresses the upper thread, forces extra lateral movement through the needle bar, and eventually produces skipped stitches or thread breakage that gets misdiagnosed as a tension problem. For anyone working across sewing and vinyl applications — a combination our team explores in depth in the guide to layering heat transfer vinyl for multi-color designs — needle changes between material types are essential, because synthetic film materials dull needles faster than woven fabric does.
Thread and Bobbin Habits
Old thread is brittle thread, and brittle thread causes sudden jams that can score the hook race on impact, turning a cheap consumable into a costly repair. Our team's practice is to test any spool sitting on a shelf for more than two years by running it through scrap fabric at full machine speed before trusting it on any actual project — a five-minute step that has prevented multiple expensive repair events in our studio. Thread storage in a sealed container away from UV light is the other half of that discipline, since ultraviolet exposure degrades polyester thread significantly faster than either ambient temperature or humidity does.
Errors That Cut a Machine's Working Life Short
Skipping the Manual
Every machine model has specific oiling points, tension default settings, and feed dog height adjustments that are not universal across brands or even across product lines within the same brand, a fact that consistently surprises home sewers who have switched machines. Treating all machines identically — oiling points that manufacturer specifications say should remain dry, skipping lubrication points that need regular attention — is how well-intentioned maintenance causes real damage that ultimately costs more than a professional shop visit would have. Our team reads the manual for every machine we test and evaluate, and our recommendation holds equally for home sewers: the manual is the mandatory starting point, not an optional reference document for edge cases.
Running Through Problems Instead of Stopping
When a machine begins skipping stitches, producing unusual mechanical noise, or generating uneven tension readings across a seam, the instinct to push through and finish the current pass is understandable but reliably damaging under any circumstances. Running a misaligned machine accelerates wear on both the hook and the needle bar, turning a five-minute adjustment into a two-week repair shop wait and a significant expense. Stopping at the first sign of a problem and diagnosing before continuing is the professional habit that keeps machines running for ten, fifteen, and twenty years — the same diagnostic discipline that applies when troubleshooting heat press HTV vinyl inconsistencies, where running through errors only compounds the damage.
Frequently Asked Questions
How often should a sewing machine receive a full maintenance service?
Our team recommends a basic cleaning after every project, a lubrication and tension test monthly, and a full professional tune-up once per year for machines in regular use. Machines used less than ten hours per month can stretch the professional service interval to eighteen months without notable performance loss.
What type of oil is safe to use on a sewing machine?
Only clear, lightweight sewing machine oil — a food-safe mineral oil formulation — is appropriate for all internal components. Our team strongly advises against WD-40, cooking oils, or multi-purpose lubricants, all of which leave residues that attract lint and degrade plastic and rubber components over time.
What causes a sewing machine to skip stitches?
In our team's experience, a dull or bent needle is responsible for the majority of skipped-stitch complaints, followed by incorrect needle-to-hook timing and improper threading. Replacing the needle and re-threading the machine from scratch resolves the problem in most cases without any additional intervention required.
Is it safe to clean a sewing machine with compressed air?
Our team recommends against compressed air for internal cleaning because it forces lint and fine debris into bearing surfaces rather than removing them. A small stiff brush — typically included in the machine's accessory kit — is the correct tool for bobbin cavity and feed dog cleaning in every scenario.
When does a sewing machine noise indicate a serious problem?
A rhythmic clicking or grinding sound synchronized with needle movement typically indicates a timing issue or foreign object caught in the hook path, both of which require immediate attention and a stop to all sewing. Squeaking or scraping noises more often indicate a lubrication deficit and can be addressed with the oiling routine described in this guide.
How long does a quality home sewing machine last with proper care?
Well-maintained home machines regularly remain in service for twenty to thirty years, and our team has reviewed machines from the 1970s still producing excellent stitch quality after consistent maintenance. The machines that fail early are almost always those that missed regular cleaning and lubrication rather than those that logged high hours under good care routines.
What is the correct needle size for general home sewing projects?
A size 80/12 universal needle is the standard starting point for most medium-weight woven fabrics including cotton, linen, and light denim, according to needle manufacturer specifications. Our team recommends matching needle type and size to each specific fabric and changing to a fresh needle at the start of every new project regardless of how recently the previous session ended.
Can a home sewer adjust the hook timing themselves?
Hook timing adjustment is not a home repair in our team's assessment — it requires a timing gauge specific to the machine model, factory calibration specifications, and the ability to verify stitch formation at multiple test points before returning the machine to service. Attempting this adjustment without proper equipment risks permanent misalignment that costs more to correct than the original timing problem would have.
Next Steps
- Pull out the current machine's manual and locate the specific oiling points, recommended oil type, and tension default settings listed by the manufacturer — these are the non-negotiable baseline for any maintenance routine.
- Replace the needle immediately if the current one has been in use for more than one project or more than eight hours of run time, then clean the bobbin cavity and feed dog area with the included brush before the next sewing session.
- Run a tension test on scrap fabric before every new project — sew a straight line at normal speed and inspect the underside for even stitch formation, which takes under three minutes and catches most problems before they reach real fabric.
- Set a recurring monthly reminder to apply one drop of sewing machine oil to the hook race, run the machine briefly on scrap fabric, and confirm the oil has distributed evenly without any visible residue transferring to the test swatch.
- Schedule a professional tune-up if the machine has not had one in over a year — ask the technician to check hook timing, feed dog height, and all tension components, and request a written record of the settings for future reference.


About Alice Davis
Alice Davis is a crafts educator and DIY enthusiast based in Long Beach, California. She spent six years teaching textile design and applied arts at a community college, where she introduced students to everything from basic sewing techniques to vinyl cutting machines and heat press printing as practical, production-ready tools. That classroom experience means she has put more sewing machines, embroidery setups, Cricut systems, and heat press units through real project work than most reviewers ever will. At PalmGear, she covers sewing machines and embroidery tools, vinyl cutters, heat press gear, Cricut accessories, and T-shirt printing guides.
You can get FREE Gifts. Or latest Free phones here.
Disable Ad block to reveal all the info. Once done, hit a button below