How to Remove Embroidery from a Shirt, Jacket, and Hat
by Alice Davis
Ever ended up with a polo shirt or baseball cap stamped with a corporate logo that no longer applies — and wondered if there's any way to make it wearable again? There is. Learning how to remove embroidery from shirt jacket and hat is a very realistic DIY project. It takes patience and the right tools, but most garments come out looking surprisingly clean afterward. This guide covers the full process — from understanding why embroidery clings so stubbornly, to choosing the right removal method, to restoring fabric once the stitches are gone. For more guides on sewing and fabric projects, visit the sewing and crafts section on PalmGear.

Contents
What Embroidery Is and Why It Clings
Embroidery is the craft of decorating fabric with stitched thread designs. It's been used on clothing and textiles for centuries. Today, most branded logos on shirts, uniforms, and hats are machine-stitched at high density. That's what makes removal more involved than simply pulling out a few loose threads.
Understanding what type of embroidery is on the garment is the first step. The removal method differs quite a bit depending on how the design was made.
Hand Embroidery vs. Machine Embroidery
These two types behave very differently during removal — and knowing the difference saves a lot of time.
- Hand embroidery uses longer, looser stitches with fewer anchoring knots. Threads are usually single-layer and easier to access from the back of the garment.
- Machine embroidery packs hundreds — sometimes thousands — of tiny stitches per square inch. It also uses a stiff backing layer called a stabilizer (a non-woven fabric placed under the garment during stitching) that adds another obstacle during removal.
Anyone managing hand embroidery thread during removal will also benefit from knowing how to keep embroidery floss from tangling — it makes pulling long thread runs much less frustrating.
Why Stitches Grip So Hard
Several factors combine to make embroidery tough to remove:
- Thread density — machine designs can have 1,000+ stitches per square inch, all interlocked
- Backing stabilizer — a stiff non-woven layer fused or stitched beneath the design area
- Knot patterns — machine embroidery locks thread segments in place at regular intervals
- Stitch tension — machine stitching pulls thread deep into the fabric weave, compressing fibers around it
- Thread count — embroidery thread is thicker than regular sewing thread and weaves more aggressively into fabric
Tip: Before starting, always check the fabric type. Delicate materials like silk, thin chiffon, or jersey knit need a much lighter touch — rushing the process on fragile fabric causes more damage than the embroidery itself.
Tools and Supplies Worth Having First
Having the right gear before starting makes a noticeable difference. Jumping in without proper tools risks slipping and cutting the garment itself — especially on thin or stretchy fabrics.
The Must-Have Items
- Seam ripper — the core tool; its small hooked blade cuts individual stitches cleanly without tugging
- Small embroidery scissors — for snipping bobbin thread on the back side in bulk
- Tweezers — for gripping and pulling out thread remnants after cutting
- Lint roller or tape — collects micro-thread fragments left behind after pulling
- Good lighting or a task lamp — essential for seeing fine stitches without straining
- Soft toothbrush — loosens and brushes away thread bits stuck in the fabric weave
- Magnifying glass — optional, but very helpful for small or intricate designs

Tool Comparison at a Glance
| Tool | Best Used For | Skill Level | Damage Risk |
|---|---|---|---|
| Seam ripper | Cutting individual stitches precisely | Beginner | Low (if used in short strokes) |
| Small scissors | Cutting bobbin thread in bulk on back side | Beginner | Medium (easy to nick fabric) |
| Tweezers | Pulling out cut thread remnants | Beginner | Very low |
| Electric stitch eraser | Quickly loosening dense machine stitching | Intermediate | Medium (requires steady hand) |
| Razor blade | Very dense areas on thick fabric like denim | Advanced | High (not recommended for beginners) |
Crafters who also work with fabric design tools will find it useful to read about types of heat transfer vinyl — another common method for adding and removing graphics from garments that shares some overlap with embroidery work.
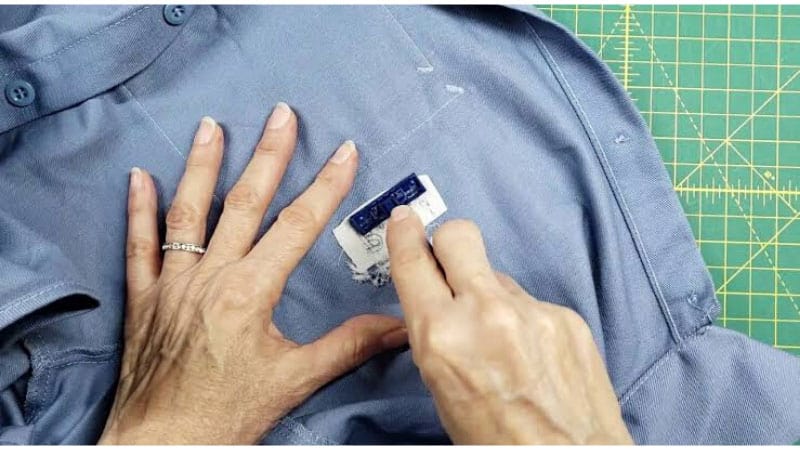
How to Remove Embroidery from Shirt, Jacket, and Hat
Warning: Never push a seam ripper through a large cluster of stitches in one stroke. Work in short sections of 5–10 stitches at a time to avoid accidentally slicing through the garment fabric underneath.
This is the core of the process. The right technique depends on whether the embroidery is hand-done or machine-stitched. Both approaches follow the same basic logic: cut the thread from the back, then pull it out from the front.
Removing Hand Embroidery
Hand embroidery uses longer, looser stitches with fewer knots — making it the easier of the two types to remove.
- Turn the garment inside out to access the back of the design.
- Locate the knot anchoring the thread — usually at the start and end of each color section.
- Use a seam ripper to carefully cut through the knot without touching surrounding fabric.
- Flip the garment to the front and gently pull the thread end with tweezers.
- Work along each stitch run, pulling slowly and steadily.
- Use tweezers on any stubborn bits that don't pull free cleanly.
- Brush the area with a soft toothbrush to remove remaining thread fragments.

Removing Machine Embroidery
Machine embroidery is denser and more time-consuming. Work in small sections and expect the process to take longer than expected on large logos.
- Turn the garment inside out to expose the back of the design.
- Use small scissors to snip the bobbin thread — this is the thread visible on the back side, usually running in tight parallel lines.
- Cut in sections of 5–10 stitches at a time; do not rush long runs.
- Flip to the front side and use tweezers to pull cut thread bundles out through the fabric.
- Repeat — cut from back, pull from front — across the entire design area.
- Once threads are removed, peel or carefully trim away the backing stabilizer.
- Run a lint roller over both sides to collect remaining micro-threads.

The careful, precise pulling required here is similar to the technique used when learning how to weed vinyl — both skills reward patience and a light touch over speed.

Special Tips for Hats and Jackets
Hats and structured jackets have quirks that require extra care beyond basic shirt removal.
For baseball caps:
- The stiff buckram (structured interfacing) in the front panel can pucker badly if threads are pulled too hard.
- Work from inside the cap crown whenever possible — flip the sweatband up to access the back of the fabric.
- Use a small LED flashlight inside the cap for better visibility.
- Pull one thread at a time on structured panels — never try to remove a whole section at once.
For jackets:
- Thick fabrics like denim, canvas, or wool handle more tension without distorting.
- Lined jackets require careful work near lining attachment seams — avoid snagging the lining.
- Leather and faux leather jackets: skip the seam ripper entirely and use only small scissors, moving extremely slowly.
- For varsity-style jackets with chenille patches — those are sewn on separately and may be removable as a full patch rather than stitch by stitch.
Anyone tackling complex sewing projects after this might enjoy learning how to quilt with a sewing machine — a natural next step in building fabric handling skills.
Caring for Fabric After Embroidery Removal
Removing embroidery almost always leaves the fabric looking a bit rough. Small holes, puckering, residue, and stiff spots are all common. Most of these issues are fixable with the right approach.
Pro tip: After removal, use a steam iron held just above the fabric rather than pressing directly — steam relaxes the compressed fibers and helps close small needle holes far more effectively than dry heat alone.
Cleaning Up Leftover Marks
Common problems after removal — and how to address each one:
- Ghost holes (tiny needle punctures) — dampen the area and steam press; most holes close on knit fabrics
- Thread color residue — apply a fabric-safe stain remover, let it sit for 10 minutes, then wash
- Puckering or warping — dampen the area and stretch the fabric gently by hand while it's still wet, then press flat
- Stabilizer remnants — soak in warm water for a few minutes to soften, then peel away slowly
- Compressed fabric texture — a soft toothbrush worked in circular motions can lift and restore some of the original texture
Note: Very dense machine embroidery on fine fabrics like satin or thin cotton may leave permanent needle holes. This is a known limitation — not a technique error. Setting realistic expectations before starting saves frustration.
Long-Term Fabric Maintenance
After cleanup, a few simple habits keep the garment in good condition going forward:
- Wash the garment after removal — it softens the fabric and flushes out remaining thread micro-fragments
- Avoid high-heat drying — heat can set puckering permanently before the fibers have relaxed
- Air dry flat for knits and stretch fabrics to prevent distortion around the previously embroidered area
- If a faint shadow or outline remains, consider covering it with an iron-on patch or a heat transfer vinyl design
- Store treated garments flat rather than folded at the former design area to reduce stress on the repaired fibers
For crafters planning new designs on a refreshed garment, exploring how to make a hooded cloak with or without sewing shows just how creative fabric-based projects can get once the basics are in hand.
And if a stored shirt comes out smelling musty after the whole process, a quick read on how to remove bad smell from clothes without washing offers a useful companion solution.
Frequently Asked Questions
Can embroidery be removed without damaging the fabric?
In most cases, yes. Hand embroidery comes out with minimal damage on almost any fabric. Machine embroidery on thick materials like denim, canvas, or wool also removes cleanly. The main risk is with very fine or sheer fabrics — those may show permanent needle holes after removal. Working slowly with a seam ripper and tweezers, rather than pulling aggressively, keeps damage to a minimum on most garments.
How long does it take to remove machine embroidery from a shirt?
A small logo roughly two inches across typically takes a beginner 30 to 60 minutes. Larger designs — like a full chest logo or a back patch — can take two to three hours or more. The density of the stitching matters as much as the size. Working in small sections of 5–10 stitches at a time is the safest approach, even if it takes longer.
What is the best tool for removing embroidery at home?
A seam ripper is the most recommended tool for home embroidery removal. Its small hooked blade cuts individual stitches precisely without snagging surrounding fabric. Paired with a pair of tweezers for pulling out cut threads, a seam ripper handles the vast majority of removal jobs — whether on shirts, hats, or jackets — without requiring any special skills or experience.
Key Takeaways
- Knowing how to remove embroidery from shirt jacket and hat starts with identifying whether the design is hand-stitched or machine-stitched, since each type requires a different removal approach.
- A seam ripper and tweezers are the most effective beginner tools — working in small sections of 5–10 stitches at a time prevents accidental fabric damage throughout the process.
- Hats and structured jackets need extra caution due to their stiff interlinings — accessing the back side of the design before pulling any threads is essential.
- After removal, steaming, gentle hand-stretching while damp, and a regular wash cycle restore most fabrics to near-original condition with little visible trace of the former design.


About Alice Davis
Alice Davis is a crafts educator and DIY enthusiast based in Long Beach, California. She spent six years teaching textile design and applied arts at a community college, where she introduced students to everything from basic sewing techniques to vinyl cutting machines and heat press printing as practical, production-ready tools. That classroom experience means she has put more sewing machines, embroidery setups, Cricut systems, and heat press units through real project work than most reviewers ever will. At PalmGear, she covers sewing machines and embroidery tools, vinyl cutters, heat press gear, Cricut accessories, and T-shirt printing guides.
You can get FREE Gifts. Or latest Free phones here.
Disable Ad block to reveal all the info. Once done, hit a button below