How to Apply Sewing Machine Oil Properly
by Alice Davis
A few months back, our team pulled a vintage Singer out of storage and fired it up for a quilting project — the noise alone was enough to know something was very wrong. The feed dogs (the small teeth that move fabric forward) ground and skipped, and the needle bar moved with a harsh metallic scrape on every stroke. A single drop of sewing machine oil in the right places changed everything within minutes. Learning how to use and apply sewing machine oil properly is one of the most underrated maintenance skills in sewing. Our hands-on experience across dozens of machines confirms how much a consistent oiling routine extends machine life and improves stitch quality.
Whether someone is working through a quilting project or tackling everyday garment repairs, a well-lubricated machine is the foundation of consistent, frustration-free results. This guide covers oil types, application steps, expert tricks, and real-world scenarios where proper oiling makes all the difference.
Contents
Sewing Machine Oil Types: A Side-by-Side Breakdown

Not all sewing machine oils are created equal, and choosing the wrong type leads to gummy buildup, staining, and accelerated wear on plastic or rubber components. Our team has tested all three major categories across mechanical and computerized machines alike, and the differences in performance are real and measurable.
Petroleum-Based, Synthetic, and Natural Oils
| Oil Type | Composition | Best For | Drawbacks |
|---|---|---|---|
| Petroleum-Based (mineral oil) | Refined crude oil, ultra-thin viscosity | Vintage and mechanical machines | Can yellow over time; not food-safe |
| Synthetic | Lab-engineered molecular chains | Computerized and high-speed machines | More expensive; overkill for basic machines |
| Natural (white mineral oil) | Highly refined, colorless, odorless | General-purpose use, fabric-safe | May need more frequent reapplication |
| PTFE-based (dry lubricant) | Teflon-particle suspension | Plastic gears, high-friction zones | Not a substitute for wet oil in metal joints |
According to the Wikipedia overview of lubricants, the core job of any lubricant is reducing friction between surfaces in relative motion — and sewing machine oil is no different, just scaled down to precision tolerances measured in fractions of a millimeter.
Which Oil Works for Which Machine
- Vintage cast-iron machines (Singer 66, Singer 201): standard clear mineral oil works best and is widely available across the sewing and crafts category at most craft retailers.
- Modern computerized machines (Brother, Janome): check the manual first — many arrive pre-lubricated with synthetic grease and need no added oil in standard positions.
- Industrial machines: heavier viscosity oils designed for high-speed use are required; standard domestic oil is too thin and burns off rapidly under sustained load.
- Sergers (overlock machines): lighter, more frequent oiling due to their high stitch-per-minute rate and multiple looper mechanisms that run simultaneously.
The Real Benefits — and a Few Drawbacks — of Regular Oiling
Why Consistent Lubrication Matters
Our team has documented measurable differences in machines maintained with regular oil versus those left dry for extended periods, and the results are not subtle.
- Reduced friction noise: a properly oiled machine runs noticeably quieter, signaling that metal-on-metal contact is minimized across all moving parts.
- Longer component lifespan: the needle bar, hook race (the rotating mechanism that catches the bobbin thread), and feed dog assembly all wear significantly faster without lubrication.
- Smoother stitch formation: oil reduces micro-vibrations that cause skipped stitches and uneven thread tension during sewing.
- Prevention of rust: even light surface rust on interior metal parts causes irreversible scoring; a thin oil film is the first line of defense.
Our team always runs a test seam on scrap fabric immediately after oiling — this removes any excess oil before it contacts a real project and prevents grease staining on finished work.
When Over-Oiling Becomes a Problem
Just as under-oiling causes damage, over-oiling creates its own set of serious problems that are harder to fix than the original friction issue.
- Excess oil migrates onto fabric, causing permanent grease stains that do not wash out regardless of detergent or water temperature.
- Oil pooling in the bobbin area attracts lint and creates a thick, varnish-like buildup that eventually seizes the hook race and other precision moving parts.
- Heavy oil deposits on plastic components can crack or soften certain polymers over time, especially in older machines with brittle nylon gears.
The rule our team applies consistently: one drop per oil point, never more, and always wipe away any visible excess before running the machine at speed.
How to Use and Apply Sewing Machine Oil: Step-by-Step Best Practices
What to Do Before Oiling
Preparation matters as much as the oiling itself, and skipping these steps is the most common mistake our team observes in home-user setups.
- Power off and unplug the machine — working on a live machine is a safety risk that experienced sewers take seriously without exception.
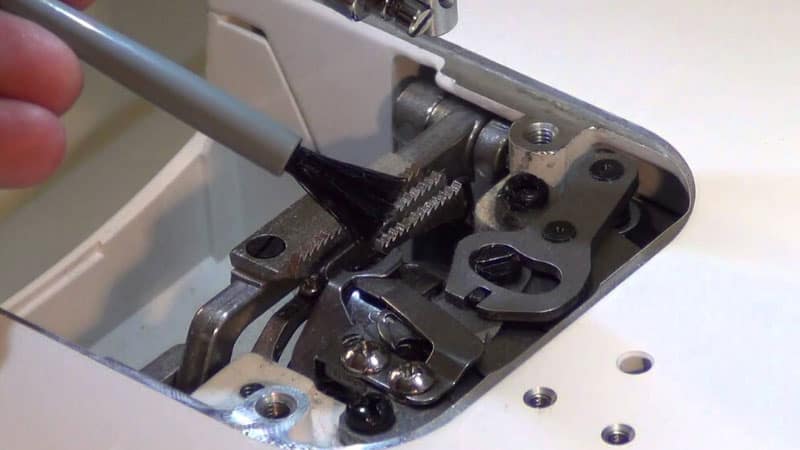
- Remove the needle, presser foot, and bobbin — this clears unobstructed access to the bobbin housing and hook race area.
- Clean out lint and dust — use the small brush included with most machines to sweep the bobbin housing, feed dogs, and needle plate channel before applying any oil.
- Check the manual for oil points — every model has specific lubrication points; applying oil near sensors on computerized machines can cause electrical damage that voids warranties.
How to Apply the Oil Precisely
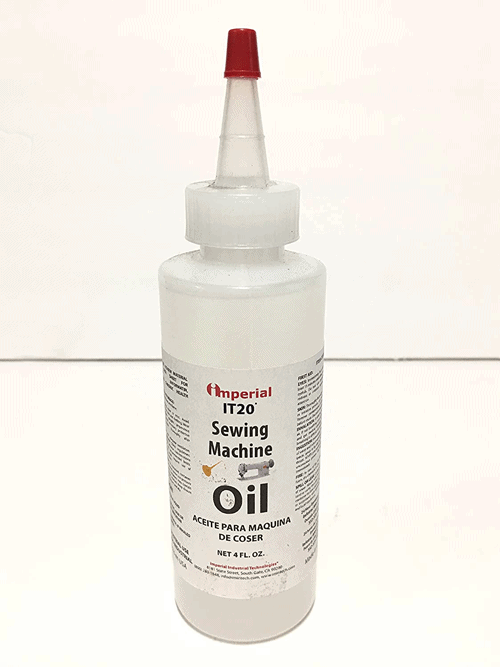
The needle-tip applicator bottle is the essential tool for anyone applying sewing machine oil without making a mess. It gives single-drop control that a standard bottle simply cannot match.
- Hold the applicator bottle vertically and gently squeeze until exactly one drop appears at the tip.
- Apply one drop to the hook race (the circular track where the shuttle moves), which is the highest-priority lubrication point on any machine.
- Apply one drop to the needle bar at its upper guide bracket, where metal meets metal on every single stitch cycle.
- Apply one drop to each designated oil hole marked on the machine's top arm (the horizontal housing above the needle area) if the manual specifies them.
- Run the machine without fabric at medium speed for 30 seconds, then wipe away any surface oil that has migrated outward using a clean lint-free cloth.
Understanding machine mechanics at this level pairs naturally with skills like removing embroidery from shirts, jackets, or hats when repairs are needed — both demand precise, hands-on technique applied to the same mechanical system.
Insider Tricks That Make the Difference
Frequency and Timing
Most people oil too infrequently, letting machines run dry for months between sessions — and our team considers this the single greatest cause of preventable mechanical wear we have documented.
- Casual sewers (1–2 hours per week): oiling every 8–10 hours of actual sewing time is the baseline recommendation from most major manufacturers.
- Heavy users (daily sewing, quilting marathons): oiling before each major session keeps joints running smoothly and prevents lint from embedding in dry metal contact zones.
- After storage: any machine stored for more than 30 days needs a fresh oil application before use, regardless of when it was last serviced.
- After cleaning: whenever lint removal happens with a brush or compressed air, oil should follow immediately — cleaning removes residual lubrication along with the debris.
Spots Most People Miss
Our team has serviced machines where obvious oil points were well-maintained but hidden areas had run completely dry. Those neglected spots cause premature failure in components meant to last for decades.
- The take-up lever arm joint — the metal pin where the thread take-up lever pivots sees constant motion on every stitch but is frequently skipped during routine maintenance.
- Presser foot bar — the vertical bar the presser foot attaches to slides up and down constantly and benefits from a light wipe of oil along its full length.
- Tension disc assembly — a single drop on the tension post (the pin the thread wraps around) prevents the discs from developing a gritty, inconsistent grip over time.
- Hand wheel bearing — the large wheel on the right side turns millions of times over a machine's life and benefits from periodic light oiling at its center hub.
Proper oiling pairs directly with correct setup, and our guide on threading a Brother sewing machine covers the complete mechanical system for those using Brother models.
Real-World Scenarios: When Oil Solves the Problem
After Heavy-Use Sessions
A quilting session involving hundreds of seam intersections, dense zigzag stitching, or thick denim layers generates far more heat and friction than standard sewing. That heat accelerates oil breakdown much faster than most people realize.
- After any session exceeding two continuous hours, our team checks the hook race for heat-thinned oil that has spread outward from its intended position.
- Machines used for upholstery-weight fabrics (canvas, leather, denim) need oiling after every major project due to the increased mechanical load on all moving parts.
- Decorative stitching projects — especially quilting — demand consistent maintenance because of the frequent direction changes and stitch-length adjustments involved. Our complete guide on how to quilt with a sewing machine covers this connection in practical detail.
Reviving a Machine That Has Been Stored
Our team has revived machines left idle for anywhere from a few months to several years. The oiling protocol for stored machines differs slightly from the standard routine.
- Apply oil to all standard points, then let the machine sit for 10–15 minutes, allowing penetration and displacement of any oxidation (surface rust) before running.
- Turn the hand wheel slowly several times before using the foot pedal — this distributes oil manually and reveals any stiff spots needing extra attention.
- Run the machine at slow speed for 2–3 minutes without fabric, listening for any grinding or irregular sounds that signal dry areas needing additional oil.
- Inspect the bobbin area closely for any gummy residue from dried old oil. Remove it with a cotton swab dampened lightly with sewing machine oil before applying fresh lubricant.
Frequently Asked Questions
Can any type of oil be used in a sewing machine?
No — only clear, lightweight sewing machine oil should be used on machine mechanisms. Cooking oils, WD-40, and general-purpose lubricants all cause gummy buildup, attract lint aggressively, and damage plastic or rubber components over time.
How often should a sewing machine be oiled?
For average home use, oiling every 8–10 hours of actual sewing time is the standard recommendation. Machines used daily or for heavy fabrics benefit from oiling before each major session to prevent dry-running wear on metal components.
What happens if a sewing machine is never oiled?
Without lubrication, metal-on-metal contact generates heat and wear that eventually seizes moving parts completely. Most people notice progressively louder operation, skipped stitches, and increased thread breakage long before a machine fails outright — all warning signs of inadequate oiling.
Is it possible to over-oil a sewing machine?
Yes, and over-oiling causes real damage. Excess oil migrates onto fabric, creating permanent stains, and mixes with bobbin-area lint to form a varnish-like residue that eventually seizes precision components including the hook race.
Does a new sewing machine need to be oiled right away?
Most new machines are factory-lubricated and do not need immediate oiling. Our team always recommends reading the manual first — some computerized machines specifically warn against adding oil to areas that contain sensors or pre-greased sealed bearings.
Where exactly does sewing machine oil get applied?
The primary oil points are the hook race, needle bar, take-up lever pivot, and presser foot bar. Any additional designated holes on the machine's top arm should be oiled exactly as the owner's manual for that specific model specifies.
Key Takeaways
- Using the right oil type for the specific machine model prevents gummy buildup, fabric staining, and long-term component damage.
- Proper application means one drop per oil point, always preceded by lint removal and followed by a test run on scrap fabric.
- Most machines benefit from oiling every 8–10 hours of use, with additional oiling after heavy sessions, after cleaning, or after any storage period exceeding 30 days.
- The hook race, needle bar, take-up lever, and presser foot bar are the four highest-priority oil points that most people overlook on a routine basis.


About Alice Davis
Alice Davis is a crafts educator and DIY enthusiast based in Long Beach, California. She spent six years teaching textile design and applied arts at a community college, where she introduced students to everything from basic sewing techniques to vinyl cutting machines and heat press printing as practical, production-ready tools. That classroom experience means she has put more sewing machines, embroidery setups, Cricut systems, and heat press units through real project work than most reviewers ever will. At PalmGear, she covers sewing machines and embroidery tools, vinyl cutters, heat press gear, Cricut accessories, and T-shirt printing guides.
You can get FREE Gifts. Or latest Free phones here.
Disable Ad block to reveal all the info. Once done, hit a button below