How to Maintain a Roller Heat Press Machine
by Alice Davis
A crafting shop owner once set aside a full weekend to press custom logos onto a batch of sports jerseys. Halfway through the session, the roller started leaving streaks across every piece. The machine was barely six months old. The culprit was not a defect — it was zero maintenance.
Knowing how to properly maintain the roller heat press machine separates users who get consistent results from those who constantly troubleshoot failed transfers. For anyone working in the heat press and vinyl space, machine care is not optional. A clean, well-adjusted roller delivers even pressure, consistent heat distribution, and transfers that bond correctly the first time. Neglected machines cause peeling, misalignment, and permanent roller damage — problems that are almost always preventable.
According to Wikipedia's overview of iron-on transfer technology, reliable adhesion depends directly on consistent heat and pressure across the transfer surface — two variables that deteriorate when roller machines are not maintained properly.
Contents
What Beginners Get Wrong vs. What Experts Always Do
Common Beginner Oversights
New roller heat press users focus almost entirely on settings — temperature, timer, pressure — and forget the machine itself needs regular attention. The result is a machine that degrades faster than it should. The most common beginner oversights include:
- Skipping the post-session wipe. Running the machine until cool and storing it without cleaning bakes residue onto the roller surface, where it hardens over time.
- Ignoring roller tension. Beginners rarely check whether the rollers apply even pressure across the full width. Uneven tension is invisible until it ruins an entire batch.
- Using the wrong cleaning products. Harsh solvents and rough materials scratch the roller coating and shorten its lifespan considerably.
- Not tracking usage hours. Without a basic log, there is no way to know when mechanical components are due for inspection or lubrication.
Scorched residue on a roller transfers contamination to every subsequent piece that passes through. Uneven tension causes designs to shift or lift at the edges — a problem that compounds silently until a full production run is ruined. For a closer look at what that damage looks like in practice, this guide on fixing heat transfer vinyl that is peeling covers the root causes in detail.
Habits That Define Experienced Operators
Experienced operators treat the roller heat press machine like any other precision tool — with a routine, not reactive attention. The difference is discipline, not advanced knowledge. What separates seasoned users comes down to a handful of consistent behaviors:
- They clean after every session, not after problems appear.
- They maintain a simple log — date, tasks completed, anything unusual observed.
- They check roller pressure before any large batch, not during it.
- They lubricate moving parts on a schedule, not when the machine starts squeaking.
- They keep spare cleaning supplies at the workstation so there is no excuse to skip the wipe-down.
Pressure calibration is one of the most overlooked elements of machine upkeep. The heat press pressure guide breaks down exactly what pressure ranges work for different materials — and those numbers only hold if the machine is mechanically sound to begin with.
Waiting for a visible problem before maintaining a roller heat press is the most expensive mistake a user can make — repairs always cost more than prevention.
How to Maintain the Roller Heat Press Machine: A Schedule That Actually Works
Daily and Weekly Tasks
The roller surface and housing collect dust, lint, and adhesive particles with every use. A daily routine takes under five minutes and prevents the majority of long-term problems. There is no substitute for consistency here — sporadic deep cleans do not compensate for skipped daily wipes.
Daily tasks:
- Wipe down the roller surface with a lint-free cloth while the machine is still slightly warm — warm, not hot.
- Remove any fabric scraps or transfer paper remnants from the feed tray and entry area.
- Check the power cord and connections for any visible wear or damage.
Weekly tasks:
- Inspect the roller surface for flat spots, cracks, or discoloration that was not there the week before.
- Run a tension test — feed a strip of plain paper through at the left edge, center, and right edge. Resistance should feel uniform at all three points.
- Wipe down the housing exterior with a damp cloth.
- Check that all visible fasteners are snug — vibration from regular operation gradually loosens hardware.
Monthly and Long-Term Checks
Monthly checks go deeper than surface cleaning. These tasks address the mechanical components that wear invisibly over time. Skipping them is how a machine ends up failing at the worst possible moment — mid-production on a deadline job.
| Maintenance Task | Frequency | Tools Needed | Time Required |
|---|---|---|---|
| Roller wipe-down | After every session | Lint-free cloth, heat press cleaner | 4 minutes |
| Paper tension test | Weekly | Plain copy paper strip | 5 minutes |
| Housing exterior clean | Weekly | Damp cloth | 3 minutes |
| Roller surface inspection | Weekly | Visual / flashlight | 2 minutes |
| Lubrication of moving parts | Monthly or every 50 hours | Machine oil, bearing grease | 15 minutes |
| Heating element check | Monthly | Thermocouple tape | 10 minutes |
| Fastener tightening | Monthly | Screwdriver / wrench set | 5 minutes |
| Full mechanical inspection | Every 6 months | Advanced user or technician | 30–60 minutes |
For lubrication, many users grab whatever oil is within reach — that is a mistake. Bearing grease belongs on roller axles. A light machine oil works on guide rails and tension adjustment mechanisms. The application principles are nearly identical to those covered in this guide on how to use and apply sewing machine oil — thin, precise application is always better than soaking a component and hoping excess oil drains away harmlessly.
Diagnosing the Most Common Roller Heat Press Failures
Uneven Pressure and Roller Slippage
Uneven pressure is the most commonly reported problem with roller heat press machines, and it traces back to one of three causes nearly every time:
- Worn roller coating: The outer layer flattens over time, especially in the center where most work passes through. A center that is slightly flatter than the edges creates a noticeable pressure gap across the width.
- Improper tension setting: Too loose and the roller slips. Too tight and it drags the substrate (the material being pressed), stretching it before it even reaches the heat zone.
- Debris caught in the roller gap: A single piece of folded transfer paper can throw off alignment for an entire session — always clear the gap before starting a batch.
The fix for most tension issues is a small adjustment at the tension knobs — the set screws on either side of the roller assembly. Make quarter-turn adjustments only, then test with a paper strip before resuming production. Large adjustments in a single step almost always overshoot the target and require correction in the opposite direction.
Heat Distribution Problems and Scorching
When certain areas of a transfer look faded while others appear scorched, the heating element may be degrading — or residue buildup on the roller surface is acting as an insulator in specific spots. Diagnosing the difference matters before ordering replacement parts or calling a technician.
Steps to diagnose heat distribution issues:
- Run thermocouple tape (heat-sensitive diagnostic tape) across the roller width to identify hot and cold zones.
- If problem zones match locations with visible residue, perform a thorough deep cleaning before assuming the heating element has failed.
- If hot and cold zones remain inconsistent after a full cleaning, the heating element or its controller likely needs professional service.
Scorching on fabric almost always points to temperature set too high for the material, or the roller feed speed set too slow. These are settings problems — not mechanical failures. Catching them early prevents settings errors from becoming permanent damage to the roller surface itself.
When Cleaning Helps — and When It Hurts
Clear Signs the Machine Needs Attention Now
Certain warning signs mean stop production and address the machine before running another piece through it. Pushing past these signals converts a maintenance task into a repair bill — or worse, ruins an entire order.
- Visible residue or discoloration on the roller surface that was not there at the start of the session
- Transfer results becoming inconsistent across a batch that was producing clean output earlier
- Unusual sounds — grinding, squeaking, or a rhythmic thump — during operation
- Fabric feeding unevenly or bunching at the entry point
- Any burning smell during operation, even faint
A burning smell deserves immediate action. It indicates either residue actively scorching on a heated surface, or an electrical issue that warrants shutting the machine down entirely. In either case, the machine should be powered off and unplugged before any investigation happens.
Over-Maintenance Mistakes to Avoid
Maintenance causes damage when done with the wrong products or technique. Users who clean aggressively without the correct materials often end up with a worse roller surface than if they had simply let the machine be. The most destructive mistakes are easy to avoid once identified:
- Cleaning with alcohol-based solvents: These degrade rubber and silicone roller coatings over time. Use a dedicated heat press cleaning solution or a mild soap-and-water mixture instead.
- Over-lubricating: Excess lubricant migrates onto the roller surface and transfers directly to fabric. A thin coat on moving parts is the correct amount — more is not better.
- Cleaning a fully cold machine: Residue hardens when cold. A slightly warm roller releases buildup far more effectively. This is chemistry, not preference.
- Using abrasive materials: Steel wool or rough scrubbing pads scratch the roller coating permanently. Lint-free cloths are the only appropriate choice.
A roller surface scratched by abrasives transfers those imperfections onto every piece of fabric that passes through — the only remedy is a full roller replacement.
Fast Maintenance Fixes Anyone Can Do Today
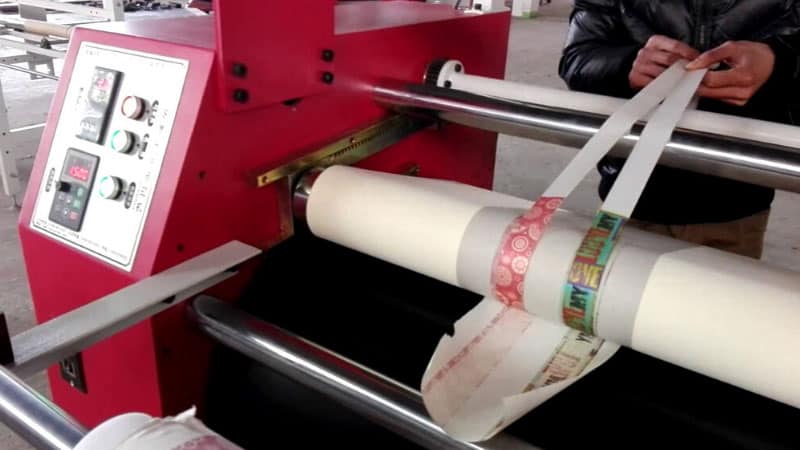
The Roller Wipe-Down Routine
The single most impactful way to maintain the roller heat press machine is also the simplest task in the entire maintenance toolkit. After every pressing session, while the machine is still warm:
- Power off and unplug the machine completely.
- Wait two to three minutes — the roller should be warm to the touch, not hot.
- Dampen a lint-free cloth with a small amount of heat press cleaning solution.
- Wipe the roller surface in long, even strokes along its length — not in circular motions, which leave streaks and push residue into the same spots.
- Follow immediately with a dry lint-free cloth to remove any remaining moisture or cleaner.
- Allow the machine to air-dry fully before covering or storing.
This routine takes four minutes. Most residue buildup that eventually requires deep cleaning — or roller replacement — traces directly to skipping this step session after session. Four minutes after every use costs nothing. A replacement roller costs considerably more.
Lubrication and Tension Checks
Lubrication is the area most users either skip entirely or overdo. The goal is thin, targeted coverage on moving components — bearing surfaces, guide rails, and the tension adjustment mechanism. Nothing else should receive lubricant.
A quick tension check takes two minutes and should become automatic before any large job:
- Cut a strip of plain copy paper about two inches wide.
- Feed it through the roller at the left edge, then the center, then the right edge.
- Resistance should feel identical at all three positions. Any variation means tension needs adjustment before production begins.
For lubrication intervals, a reliable rule is every 50 hours of active use or once every two months — whichever arrives first. The interval must be documented. Without a record, the gap extends unconsciously until the machine gives audible notice in the form of squeaking or grinding. By that point, the components have already been running dry longer than they should.
The roller heat press machine rewards consistent care above everything else. Users who build these habits into their workflow see fewer production failures, cleaner transfers, and equipment that holds its performance over a much longer service life.
Frequently Asked Questions
How often should the roller on a heat press machine be cleaned?
The roller should be wiped down after every use while still slightly warm. A deeper inspection and clean — using a dedicated heat press cleaner and checking for embedded residue — should happen weekly for regular users, or after any session involving heavy adhesive transfers. Waiting until problems appear means the residue has already had time to harden and bond firmly to the roller surface, making removal significantly harder.
What cleaning products are safe to use on a roller heat press machine?
Dedicated heat press cleaning solutions are the safest option available. A mild soap-and-water mixture applied with a lint-free cloth also works well for light residue. Avoid alcohol-based solvents, acetone, and any abrasive scrubbing materials — these degrade rubber and silicone roller coatings over time, causing surface damage that cannot be reversed without replacing the roller entirely.
Can a damaged roller surface be repaired, or does it need full replacement?
Minor residue buildup can be cleaned off without lasting damage. However, flat spots, deep cracks, permanent scratches, and hardened contamination that has penetrated the roller coating are not repairable through cleaning or resurfacing. Once the roller surface is physically compromised, replacement is the correct path forward. Continuing to press fabric through a damaged roller simply transfers those imperfections to the material.
What causes uneven pressure in a roller heat press machine?
The three most common causes are worn roller coating that has flattened over time (especially in the center), incorrect tension settings, and debris caught in the roller gap. A simple paper strip test — feeding a two-inch strip through at the left, center, and right edges — reveals uneven tension immediately. Tension knobs should be adjusted in quarter-turn increments and retested before any production run begins.
How do users know when to lubricate the roller heat press machine?
A reliable general schedule is every 50 hours of active operation or once every two months — whichever arrives first. Squeaking, grinding, or increased resistance in moving parts during operation are all signals that lubrication is already overdue. Documenting the lubrication date each time is essential — without a written record, the interval tends to extend far longer than intended without anyone noticing.
Is it safe to clean the roller while the machine is still warm?
Warm is actually the correct time to clean. Residue softens when the roller is warm and releases from the surface far more easily than when the machine has fully cooled. The machine should be powered off and unplugged before any cleaning begins, and the roller should be warm to the touch rather than hot. Cleaning a fully cold machine means fighting hardened residue that required a fraction of the effort just thirty minutes earlier.
What happens if a roller heat press machine is stored without cleaning?
Residue sitting on the roller surface hardens as the machine cools and then cures further over time. A machine stored uncleaned for even a few sessions accumulates residue that requires significantly more effort to remove than a fresh post-session wipe would have. Over weeks or months, that buildup becomes a permanent layer that affects heat distribution, pressure uniformity, and transfer quality on every subsequent job until it is addressed.
Does roller tension directly affect transfer print quality?
Roller tension has a direct and measurable impact on transfer quality. Too little tension allows the roller to slip, causing inconsistent pressure that results in blurred or partially bonded designs. Too much tension drags and stretches the fabric before it reaches the heat zone, distorting the substrate and misaligning the transfer. Even, calibrated tension across the full roller width is what delivers the consistent pressure required for clean, fully bonded results on every piece.
The roller heat press machine that gets cleaned after every session outlasts the one that gets fixed after every failure — every time.


About Alice Davis
Alice Davis is a crafts educator and DIY enthusiast based in Long Beach, California. She spent six years teaching textile design and applied arts at a community college, where she introduced students to everything from basic sewing techniques to vinyl cutting machines and heat press printing as practical, production-ready tools. That classroom experience means she has put more sewing machines, embroidery setups, Cricut systems, and heat press units through real project work than most reviewers ever will. At PalmGear, she covers sewing machines and embroidery tools, vinyl cutters, heat press gear, Cricut accessories, and T-shirt printing guides.
You can get FREE Gifts. Or latest Free phones here.
Disable Ad block to reveal all the info. Once done, hit a button below