Sewing Machine Tension: What Is It and How to Adjust?
by Alice Davis
Have you ever pulled a seam apart and found loops of thread pooling on the underside where there should be a clean, locked stitch — and wondered whether your machine was broken or simply misunderstood? Sewing machine tension is the answer, and once you understand exactly how it works, you will find that most stitch defects trace back to a single, adjustable variable. This guide, from the sewing and crafts resource hub at PalmGear, breaks down the mechanics, walks through the calibration sequence, and clears up the persistent myths that waste your thread and your time.
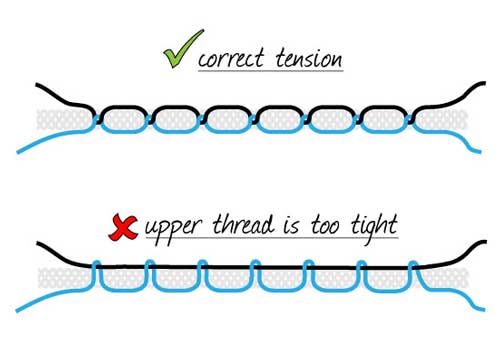
Sewing machine tension describes the balanced resistance applied to both the upper thread and the bobbin thread as they interlace inside the fabric to form a lockstitch. When those two forces are equal, the knot lands precisely at the midpoint of the fabric layer, invisible from both surfaces. When they diverge — even slightly — the knot migrates toward one face, producing the loops, puckers, and skipped stitches that derail projects at the worst possible moment. Understanding this balance is the foundation of consistent, professional results, regardless of whether you are quilting, garment sewing, or finishing home decor work.
Contents
What Sewing Machine Tension Actually Means
Before touching a dial or opening the bobbin case, it pays to understand what tension physically represents inside the machine. The lockstitch mechanism relies on two thread sources — the spool above and the bobbin below — meeting inside the fabric sandwich to form an interlocked knot. Tension, in mechanical terms, is the resistance each thread encounters along its path, and the machine's job is to keep those resistances matched so the knot forms exactly at the center of the material layers rather than being dragged toward either surface.
The Bobbin and Upper Thread Relationship
The upper thread travels through a series of guides, a tension disc assembly, and a take-up lever before reaching the needle eye; each of those contact points adds or removes friction, and the dial you turn on most machines controls the clamping force of the disc assembly specifically. The bobbin thread exits the bobbin case through a small spring that provides its own counterbalancing resistance. On most domestic machines, that bobbin spring is set at the factory and left undisturbed, which means the upper tension dial becomes your primary calibration tool for balancing the entire system across different fabrics and threads.
- Upper thread path: spool pin → thread guides → tension discs → take-up lever → needle
- Bobbin thread path: bobbin case → tension spring → throat plate hole → fabric
- Ideal knot position: exactly halfway through the fabric, invisible from either face
- Knot displacement: any imbalance shifts the knot toward the surface where thread resistance is lower
According to the Wikipedia entry on the lockstitch, the interlocking stitch mechanism was patented in the 1840s and the fundamental geometry has remained unchanged ever since — meaning every tension problem you encounter today has a century-and-a-half of documented solutions available to inform your troubleshooting approach.
Reading Your Stitch for Tension Clues
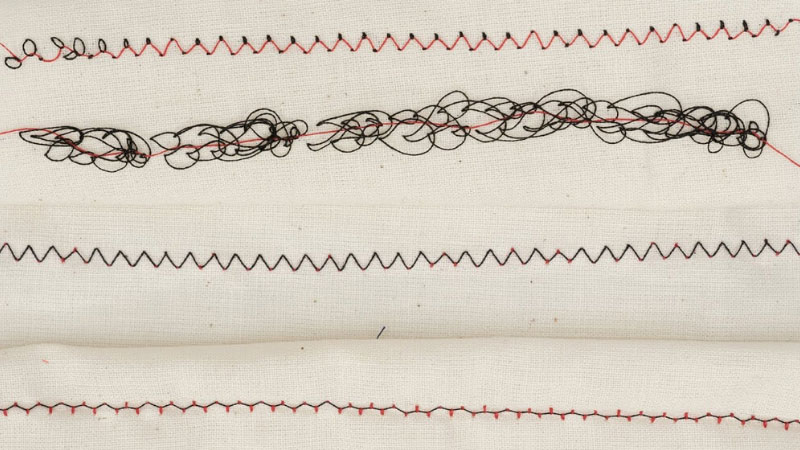
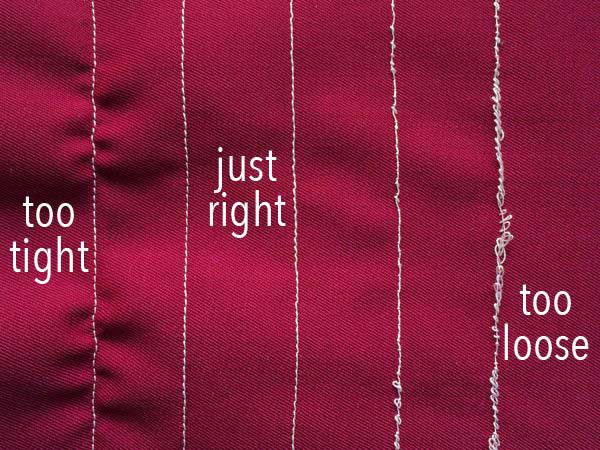
A test seam on scrap from your actual project fabric is the fastest diagnostic available to you, and examining both surfaces before drawing conclusions about adjustment direction prevents the common mistake of correcting in the wrong direction. Sew a straight line of about three inches on a doubled layer of your target material, then lay it flat under good light before making any decisions.
- Loops on the underside: upper tension is too loose — the upper thread is being dragged downward through the fabric by the bobbin thread
- Loops on the top surface: upper tension is too tight, pulling the bobbin thread upward and through the material
- Puckering along the seam line: both threads may be too tight, compressing the fabric between the interlocked knots and drawing it together
- Flat, even stitch on both faces: tension is correctly calibrated for that specific fabric and thread combination
If you are dealing with mechanical issues that persist beyond tension calibration, the guide on basic sewing machine repair and maintenance covers needle replacement sequences, feed dog cleaning protocols, and other variables that interact directly with how tension performs on different materials.
The Mechanisms That Control Tension
Understanding the hardware involved in sewing machine tension gives you a clearer mental model for why certain adjustments produce results and others do not. Most sewers interact exclusively with the tension dial, but that dial is only one node in a system that includes disc assemblies, springs, and the bobbin case geometry working together to balance two independent thread paths on every stitch cycle.
Upper Tension Dial and Disc Assembly
Most domestic machines number the upper tension dial from 0 to 9, with the midpoint — typically 4 or 4.5 — representing the factory-calibrated setting for medium-weight woven fabric sewn with standard 50-weight polyester or cotton thread. Behind that dial sits a pair of metal discs that clamp around the thread as it passes between them; rotating the dial increases or decreases the spring pressure holding those discs together, which directly changes how much resistance the upper thread encounters as it pulls through on each stitch cycle.
Computerized machines often replace the physical dial with a digital input panel, but the underlying disc mechanism remains identical across virtually all domestic lockstitch machines. The number displayed still represents spring clamping pressure, and the calibration logic is unchanged — higher numbers mean more clamping force on the thread, which means higher effective upper tension and a stitch that pulls toward the top surface of your work.
Bobbin Case and Tension Spring
The bobbin case contains a small, flat spring with a single adjustment screw — typically a fine Phillips or flathead depending on the manufacturer — that controls how tightly the spring grips the bobbin thread as it exits. Turning that screw clockwise tightens the spring and increases bobbin thread resistance; counterclockwise loosens it and reduces resistance. The critical practitioner caveat is that most technicians recommend marking your bobbin screw position with a paint pen before touching it, because the functional adjustment range is measured in fractions of a turn and it is genuinely difficult to return to a previous setting without a visual reference.
- Bobbin screw adjustment increment: approximately one-quarter turn at a time maximum
- Clockwise rotation: tightens spring, increases resistance on bobbin thread
- Counterclockwise rotation: loosens spring, reduces bobbin thread resistance
- Factory position: typically pre-calibrated for 40–50 weight standard thread on OEM bobbins
If you work with vinyl-adjacent materials — finishing sewn panels before applying heat transfer graphics — understanding thread tension and material surface behavior overlap meaningfully with the techniques covered in the guide on applying heat transfer vinyl step by step. Crafters who combine sewn construction with layered vinyl decoration will also find the notes on layering heat transfer vinyl for multi-color designs useful for understanding how seam lines interact with applied graphics at the material interface.
How to Adjust Sewing Machine Tension Step by Step
Tension adjustment is an iterative calibration process rather than a single-dial fix, and approaching it in the correct sequence produces repeatable results where random adjustment produces frustration. The order of operations matters here as much as the specific values you land on, because skipping the first step wastes every adjustment you make afterward.
Test Before You Touch the Dial
Re-thread the machine completely — upper thread and bobbin — before making any tension adjustments whatsoever. A thread that has slipped out of a guide, bypassed the tension discs without engaging them, or missed the take-up lever slot will produce every symptom of a tension problem while the actual dial settings remain perfectly correct. This overlooked first step resolves a surprising proportion of apparent tension failures without any calibration at all, and investing thirty seconds in a full re-thread before diagnosing is always the right first move.
- Raise the presser foot before threading — this mechanically opens the tension discs to accept the thread
- Confirm the bobbin is oriented so the thread pulls in the rotational direction specified in your manual
- Verify the thread passes through the take-up lever slot rather than around the outside of it
- Use a double layer of your actual project fabric for the test seam, not a substitute material
- Sew at normal operating speed, since very slow test stitching can produce misleading results on some machines
Fine-Tuning for Your Fabric and Thread
Once you have confirmed correct threading and have a readable test seam in hand, adjust the upper tension dial in half-number increments and re-test after each change; moving by full numbers at once makes it easy to overshoot the balanced point, which then requires additional test seams to walk back. The direction of your adjustment follows directly from your stitch diagnosis — loops on the bottom surface require increasing upper tension, while loops on the top surface require decreasing it.
For crafters who also work with heat press applications, understanding material resistance at seam lines maps directly onto adjacent skills. Much the same way that heat press pressure settings require calibration to specific material thickness and composition, sewing machine tension requires recalibration any time your fabric weight or thread size changes — the underlying principle of matched resistance producing clean, professional results is identical across both disciplines.
Tension Settings Across Fabric and Thread Types
No single tension value works universally across the range of materials a typical sewing machine encounters, and understanding how different fabrics interact with the machine's balance point helps you anticipate adjustments before you ever load the first needle. The table below gives practical starting baselines, though your specific machine, thread brand, and needle size will require you to fine-tune from these reference points using the test seam method.
| Fabric Type | Thread Weight | Starting Upper Tension | Adjustment Direction | Practitioner Notes |
|---|---|---|---|---|
| Quilting cotton (2 layers) | 50 wt polyester / cotton | 4.0–4.5 | Neutral | Standard calibration baseline for most machines |
| Denim / canvas | 40 wt polyester | 3.5–4.0 | Slightly lower | Tight weave resists thread delivery; reduced tension prevents seam puckering |
| Stretch knit / jersey | 40 wt polyester | 3.0–4.0 | Lower; use stretch stitch | Fabric elongation during stitching requires reduced tension to prevent thread breakage |
| Silk / chiffon | 60 wt silk or fine poly | 2.5–3.5 | Lower | Fine-weave structures demand reduced tension to avoid weave distortion at the needle |
| Vinyl / faux leather | 40 wt polyester | 3.0–3.5 | Lower | Non-porous surface changes thread friction profile significantly compared to woven materials |
| Fleece / thick batting | 40–50 wt polyester | 4.0–5.0 | Slightly higher | Material loft reduces effective thread resistance; upward nudge often needed to lock knot properly |
| Embroidery (stabilized) | 40 wt rayon / polyester | 1.5–3.0 | Significantly lower | Dense stitch coverage requires loose upper tension to prevent thread pull-through on top surface |
Thread Weight and Tension Interaction
Thread weight directly affects how much friction is generated inside the tension disc assembly, which is why a machine perfectly balanced for 50-weight thread will exhibit upper thread loops the moment you switch to 40-weight without recalibrating. Heavier thread — lower numbers in the weight designation system — takes up more physical space between the discs and generates more intrinsic friction, which effectively adds to whatever spring pressure the dial is applying; this means you often need to reduce upper tension when moving to heavier thread, even if the dial setting felt correct for your previous material.
Specialty threads add additional variables because their surface coatings and core constructions interact differently with disc geometry than standard spun polyester does. Metallic threads in particular tend to require both reduced upper tension and a reduced stitching speed to prevent shredding and fraying at the needle eye, and monofilament threads — commonly used for invisible hems and appliqué — typically require tension settings well below the midpoint to prevent the thread's memory from pulling stitches out of alignment after the seam relaxes.
When to Override Default Settings
Certain techniques require deliberately unbalanced tension as a design element rather than a calibration error. Bobbin work — winding a heavy decorative thread onto the bobbin and sewing the project face-down — requires very high upper tension to pull the bobbin thread up to the fabric surface from below, creating textured, expressive lines that no standard stitch delivers. Gathering seams often benefit from deliberately high upper tension to produce more pronounced fabric gathering with less manual effort at the gathering step. Understanding that balanced tension is a default rather than an absolute rule opens up a broader range of intentional techniques.
If you regularly work with glitter or specialty surface materials in your craft projects alongside standard sewn construction, understanding how surface texture affects material handling decisions is valuable context — the comparison of glitter HTV versus regular HTV explores surface behavior differences that inform how you approach layered or decorated seam intersections in combined-technique projects.
Common Tension Myths That Lead Sewers Astray
Sewing machine tension is surrounded by persistent misconceptions that circulate in online communities, hobbyist forums, and occasionally older print references, and recognizing these myths prevents unnecessary adjustments that introduce new problems without resolving the original one. Two myths in particular cause the most downstream damage to sewers at every skill level.
The "Always Use 4" Misconception
The idea that the midpoint of the tension dial is universally correct for all sewing has been repeated so frequently that many sewers treat it as a rule rather than a starting point. It is a useful default for medium-weight woven fabric sewn with standard 50-weight thread — and nothing more than that. Treating 4 as a fixed setting means you will never sew silk, denim, stretch knit, vinyl, or dense embroidery with correct tension because all of those materials require meaningful deviations from the center position to produce balanced stitches.
The more functional mental model is that 4 serves as your calibration zero — the position you return to between projects as a reset reference — and every new material and thread combination you sew will tell you, through the test seam, whether to stay at that position or move away from it. For sewers experiencing persistent mechanical issues alongside tension symptoms, reviewing the diagnostic framework in the sewing machine repair and maintenance guide helps isolate whether the root cause is actually tension or an underlying mechanical fault disguised as a tension problem.
Blaming Tension for Every Skipped Stitch
Skipped stitches are routinely attributed to tension problems when the actual cause is almost always a needle issue: a bent shaft, a dull tip, the wrong needle type for the fabric, or a needle that is not fully seated and locked in the clamp. The needle is the highest-consumption wear item on any sewing machine, and industry practice — followed by production sewers, not just technicians — is to change it every eight hours of actual sewing time or at the start of every major project, whichever comes first.
- Skipped stitches on knit fabrics: almost always a ball-point needle issue, not a tension problem
- Skipped stitches on dense or thick materials: try a sharper needle in the next size up before adjusting tension
- Intermittent skipping across fabric types: inspect the needle eye for a burr, or check the shaft for any deviation from straight
- Consistent skipping regardless of material: the needle is very likely seated incorrectly or is mismatched to the foot and throat plate combination in use
For crafters who combine machine sewing with heat press workflows — finishing garment panels before applying graphics, for instance — understanding that different material thicknesses require both needle and tension recalibration is directly analogous to the way heat pressing HTV vinyl requires specific time and pressure profiles per material thickness and composition. The diagnostic precision mindset transfers across both disciplines cleanly. If your creative workflow also includes a Cricut for cutting vinyl before sewing panels together, the guide on using a Cricut for heat transfer projects covers material interaction details relevant to combined sewing-and-vinyl workflows. For broader equipment troubleshooting across a craft studio setup, the resource on common heat press problems and fixes offers a systematic diagnostic framework that applies equally well to other precision equipment.
Frequently Asked Questions
What exactly is sewing machine tension?
Sewing machine tension refers to the balanced resistance applied to both the upper spool thread and the bobbin thread as they interlace inside your fabric to form a lockstitch. When the two resistances are matched, the interlocking knot forms at the midpoint of the fabric layer and remains invisible from both the top and bottom surfaces of your work.
How can I tell if my tension is too tight or too loose?
Sew a three-inch test seam on a doubled scrap of your actual project fabric, then examine both surfaces carefully. Loops on the underside indicate upper tension that is too loose; loops or pulled stitches on the top surface mean upper tension is too tight. A flat, even stitch visible on both faces indicates correct calibration for that material and thread combination.
Should I adjust the bobbin tension or just the upper dial?
In most situations you should adjust only the upper tension dial first, since it is designed as the primary calibration control. The bobbin spring is factory-set for standard thread, and adjusting the bobbin screw without marking its original position makes returning to baseline extremely difficult. Reserve bobbin spring adjustments for specialized techniques like bobbin work or for persistent problems that upper dial changes alone cannot resolve.
Why do I need to rethread before adjusting tension settings?
A thread that has not engaged correctly with every guide, the tension disc assembly, and the take-up lever will produce every symptom of a tension problem regardless of what the dial reads. Re-threading with the presser foot raised — which mechanically opens the tension discs — ensures the thread is actually interacting with the mechanism your dial controls before you attempt any calibration.
Does changing thread type require a tension adjustment?
Yes, and often significantly. Heavier thread generates more intrinsic friction inside the tension disc assembly, effectively adding to whatever spring pressure the dial applies, which typically means reducing upper tension when switching to a heavier weight. Specialty threads like metallic, monofilament, and coated decorative threads interact differently with disc geometry than standard spun polyester and usually require reduced upper tension and sometimes slower stitching speed as well.
How often should I recalibrate sewing machine tension?
You should recalibrate any time you change fabric type, thread weight, needle size, or stitch type, and as a standard practice at the start of each new project. Sewing a short test seam on scrap from your actual project material takes under a minute and prevents tension-related defects from appearing in your finished work where they are difficult or impossible to correct after the fact.
Run the test seam first, read what it tells you, and sewing machine tension transforms from your most mysterious variable into your most reliable one.


About Alice Davis
Alice Davis is a crafts educator and DIY enthusiast based in Long Beach, California. She spent six years teaching textile design and applied arts at a community college, where she introduced students to everything from basic sewing techniques to vinyl cutting machines and heat press printing as practical, production-ready tools. That classroom experience means she has put more sewing machines, embroidery setups, Cricut systems, and heat press units through real project work than most reviewers ever will. At PalmGear, she covers sewing machines and embroidery tools, vinyl cutters, heat press gear, Cricut accessories, and T-shirt printing guides.
You can get FREE Gifts. Or latest Free phones here.
Disable Ad block to reveal all the info. Once done, hit a button below